> ## Documentation Index
> Fetch the complete documentation index at: https://ampersand-24eb5c1a-odoo-deep.mintlify.site/llms.txt
> Use this file to discover all available pages before exploring further.
# NetSuite
This guide walks you through connecting your NetSuite account to an integration using OAuth 2.0 Client Credentials (Machine to Machine).
## Before installing a NetSuite integration
You will need **Administrator access** to your NetSuite account.
### 1. Install the bundle
1. Navigate to **Customization** > **SuiteBundler** > **Search & Install Bundles**.
2. Search for the bundle name or ID.
3. Select the bundle from the results and click **Install**.
4. Wait for the installation to complete. This may take a few minutes.
The bundle will install SuiteScripts and custom objects (fields, records, roles, etc) into your NetSuite account.
### 2. Verify the deployment
1. Navigate to **Customization** > **Scripting** > **Script Deployments**.
2. Find the RESTlet deployment installed by the bundle and click on 'View'.
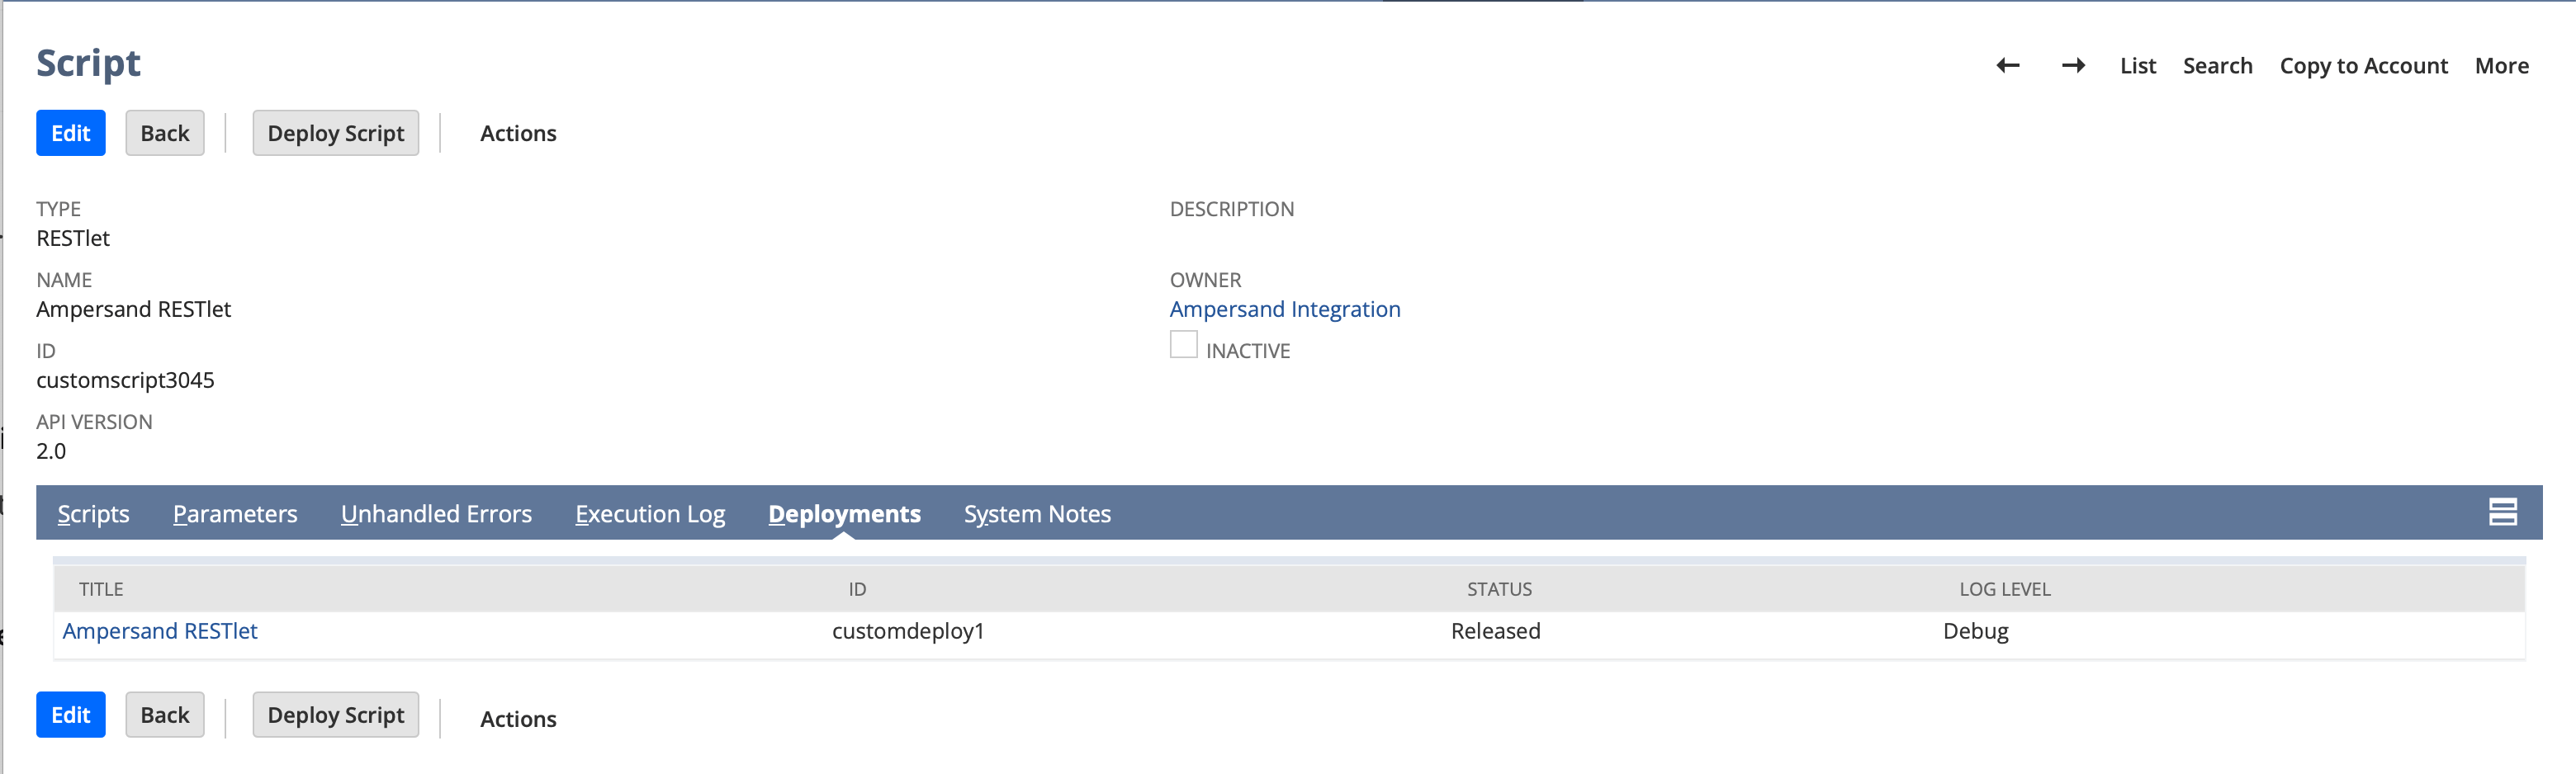 3. Verify the deployment **Status** is **Released**.
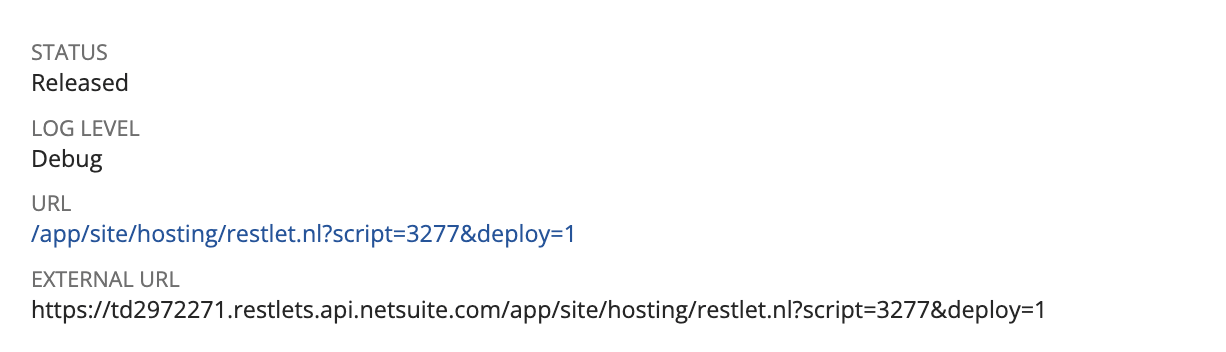
4. Click on the name of the script, then note the **URL** — you will need it for the installation step.
3. Verify the deployment **Status** is **Released**.
4. Click on the name of the script, then note the **URL** — you will need it for the installation step.
 ### 3. Enable required features
1. Log in to *NetSuite* as an Administrator.
2. Navigate to **Setup** > **Company** > **Enable Features** > **SuiteCloud**.
3. Under **Manage Authentication**, check **OAuth 2.0**.
4. Under **SuiteScript**, check **Server SuiteScript**.
5. Under **Manage Authentication** (or **SuiteTalk**), check **REST Web Services**.
6. Make sure that the following features are also enabled in your environment:
* Accounting
* Custom Records
* File Cabinet
7. Click **Save**.
### 4. Create an integration record
The integration record identifies the external application that will connect to your NetSuite account.
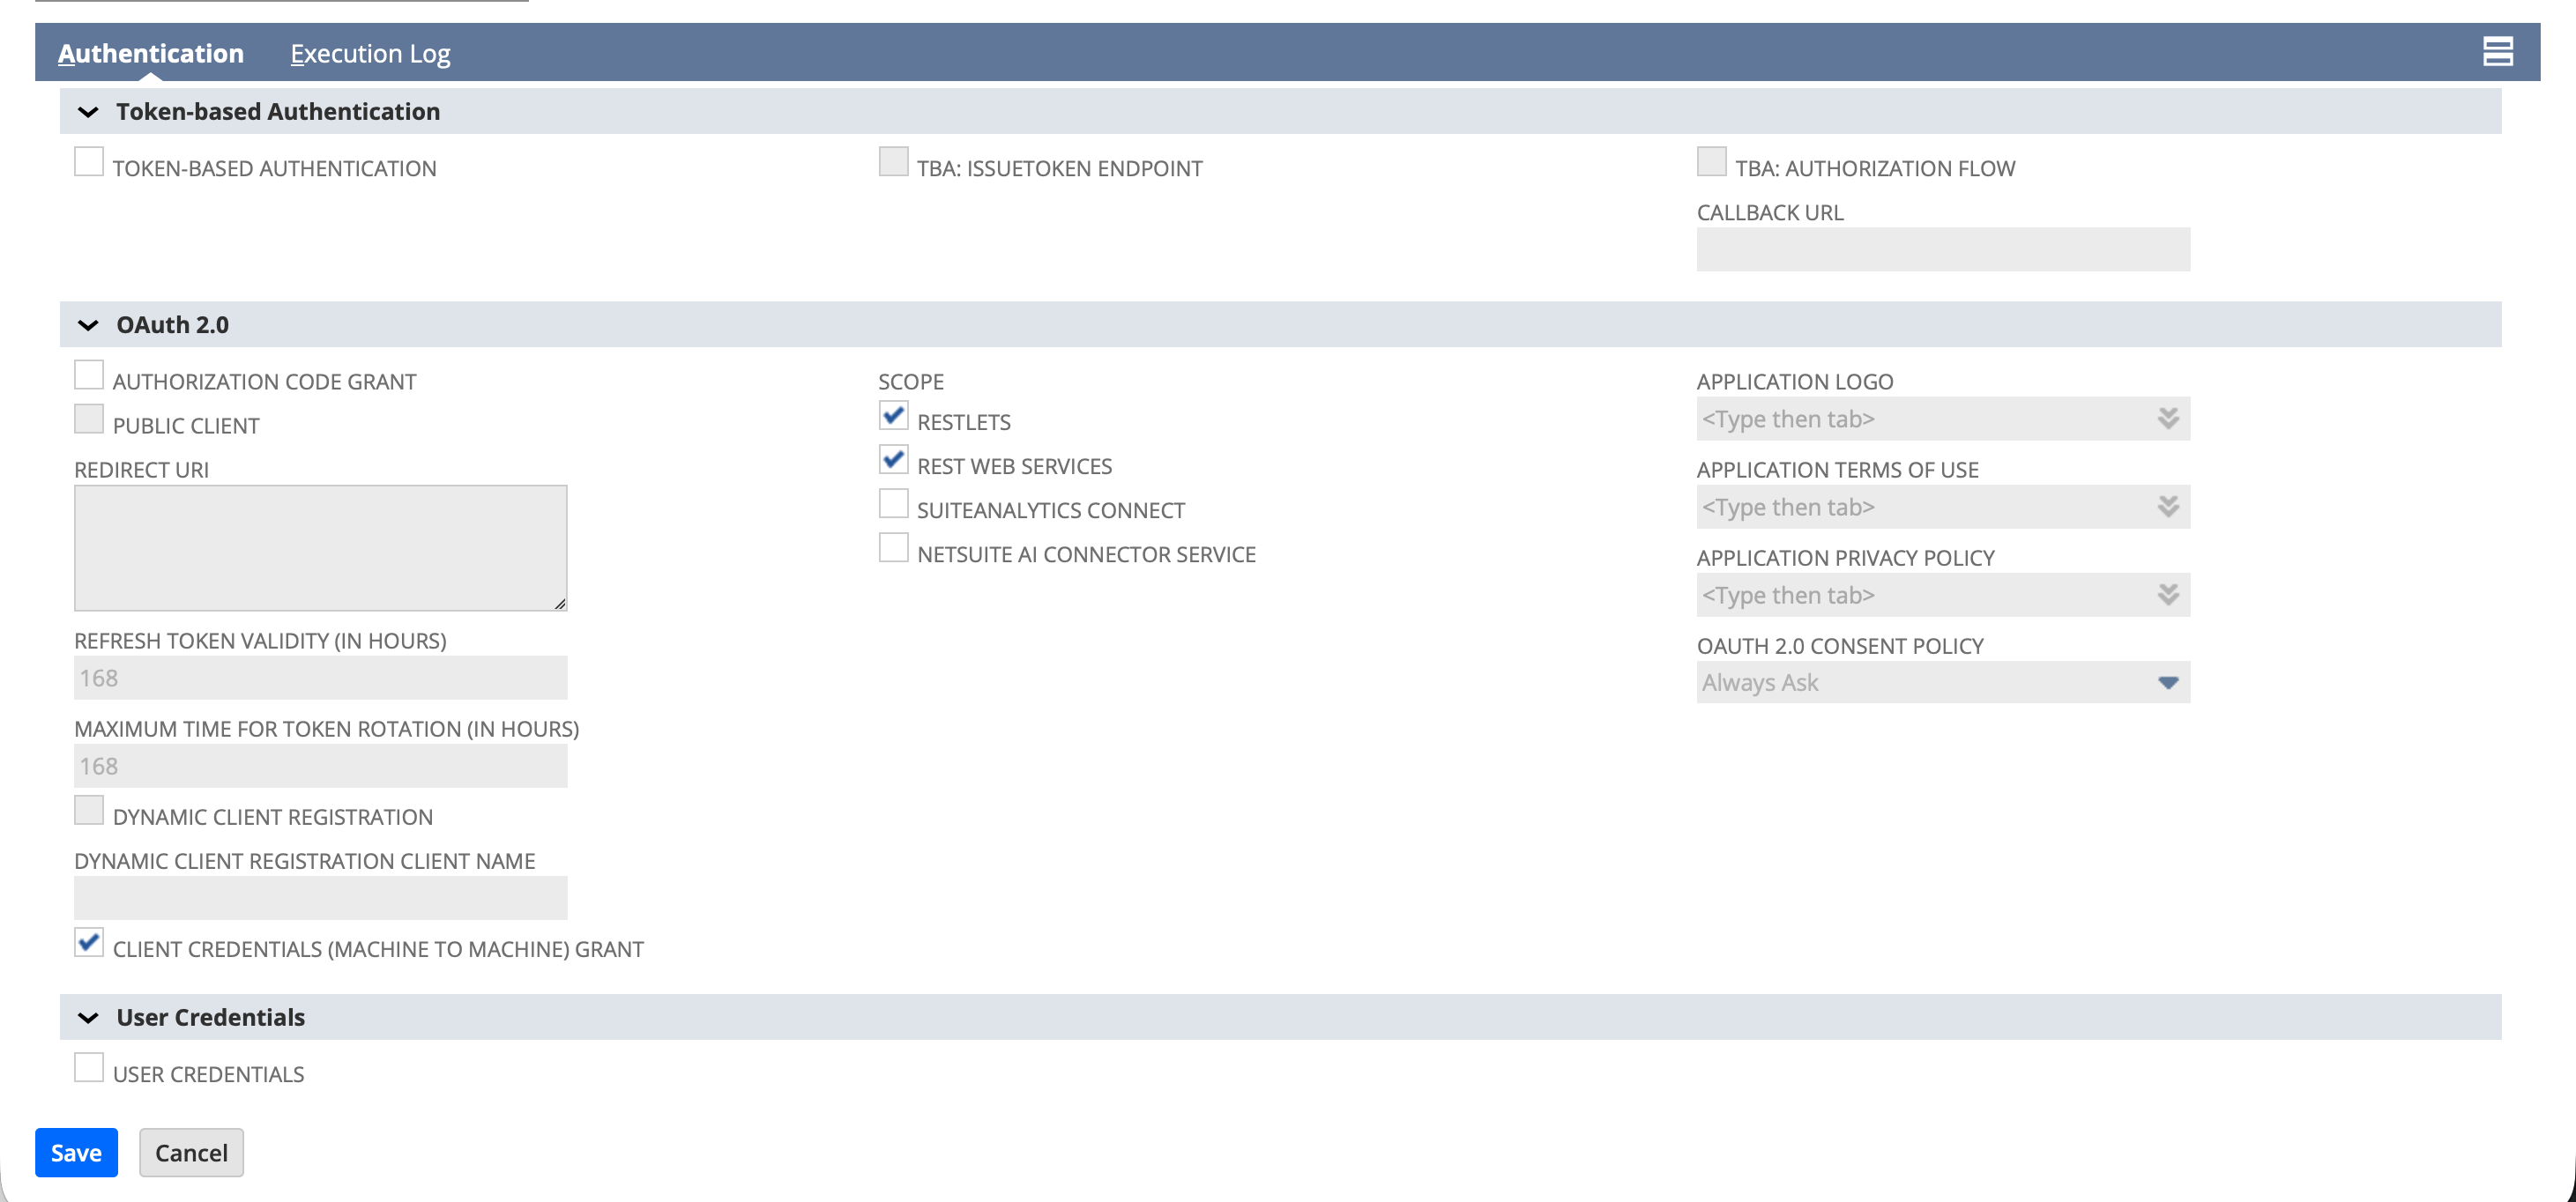
1. Navigate to **Setup** > **Integration** > **Manage Integrations** > **New**.
2. Enter a **Name** for the integration (e.g. "Ampersand Integration").
3. Under the **Token-based Authentication** section:
* Uncheck **TBA: Authorization Flow**
* Uncheck **Token-Based Authentication**
4. Under the **OAuth 2.0** section:
* Uncheck **Authorization Code Grant**
* Check **Client Credentials (Machine to Machine) Grant**
5. Under **Scope**, check the following:
* **RESTlets**
* **REST Web Services**
6. Click **Save**.
### 3. Enable required features
1. Log in to *NetSuite* as an Administrator.
2. Navigate to **Setup** > **Company** > **Enable Features** > **SuiteCloud**.
3. Under **Manage Authentication**, check **OAuth 2.0**.
4. Under **SuiteScript**, check **Server SuiteScript**.
5. Under **Manage Authentication** (or **SuiteTalk**), check **REST Web Services**.
6. Make sure that the following features are also enabled in your environment:
* Accounting
* Custom Records
* File Cabinet
7. Click **Save**.
### 4. Create an integration record
The integration record identifies the external application that will connect to your NetSuite account.
1. Navigate to **Setup** > **Integration** > **Manage Integrations** > **New**.
2. Enter a **Name** for the integration (e.g. "Ampersand Integration").
3. Under the **Token-based Authentication** section:
* Uncheck **TBA: Authorization Flow**
* Uncheck **Token-Based Authentication**
4. Under the **OAuth 2.0** section:
* Uncheck **Authorization Code Grant**
* Check **Client Credentials (Machine to Machine) Grant**
5. Under **Scope**, check the following:
* **RESTlets**
* **REST Web Services**
6. Click **Save**.
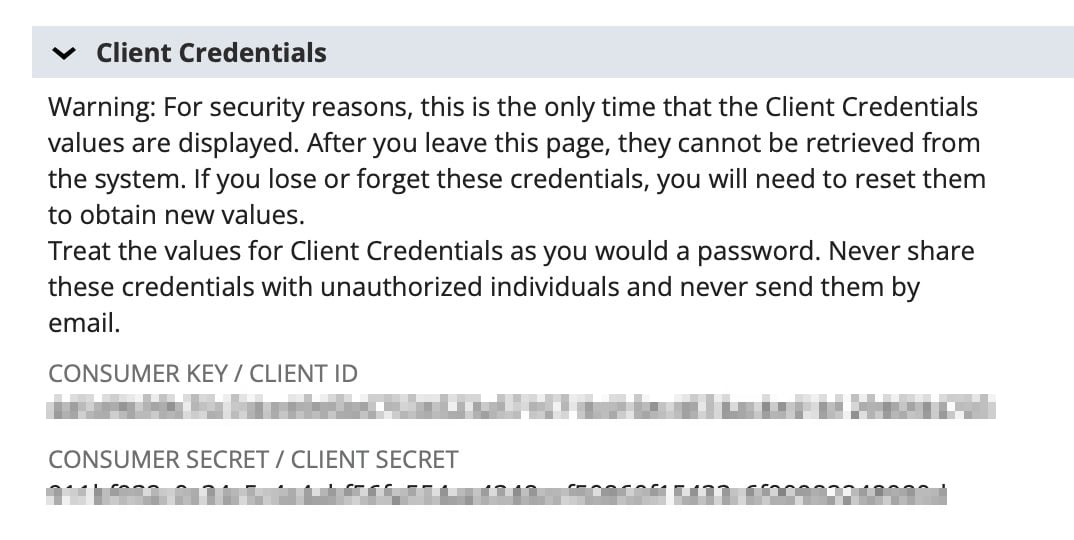
 7. After saving, NetSuite displays the **Consumer Key / Client ID** under the **Client Credentials** section. Copy this value and store it securely — it is shown only once and cannot be retrieved later.
 ### 5. Generate a certificate key pair
Open a terminal in the folder where you want to create the files. You need **OpenSSL** available in that environment (macOS and most Linux distributions include it by default). On **Windows**, use **Git Bash** (bundled with [Git for Windows](https://gitforwindows.org/), which includes OpenSSL), **WSL**, or install OpenSSL and ensure it is on your `PATH`.
Run the following commands to generate an EC private key and a self-signed certificate:
```bash theme={null}
openssl ecparam -name prime256v1 -genkey -noout -out private-key.pem
```
```bash theme={null}
openssl req -new -x509 -key private-key.pem -out cert.pem -days 730
```
You will be prompted for certificate details (country, organization, etc.). You can press Enter to accept defaults for all fields.
This produces two files:
* `private-key.pem` — Your private key. You will base64-encode this and share it when installing the integration.
* `cert.pem` — Your public certificate. You will upload this to NetSuite in the next step.
You will then need to base64-encode your private key before sharing it during the installation process. Use the command that matches your environment:
**macOS (Terminal)**
```bash theme={null}
base64 -i private-key.pem
```
**Linux, Git Bash, or WSL**
```bash theme={null}
base64 -w 0 private-key.pem
```
**Windows (PowerShell)**
From the directory that contains `private-key.pem`:
```powershell theme={null}
[Convert]::ToBase64String([IO.File]::ReadAllBytes((Resolve-Path 'private-key.pem')))
```
Copy the encoded string (a long single line, e.g. starting with `LS0tLS1CRUdJTiBFQyBQUklWQVRFIEtFWS0tLS0t...`). It will be required during the installation process.
### 6. Assign the integration role to a user or create a new user
The bundle will include a custom role with the permissions needed for the integration. You need to assign this role to the employee/user account that the integration will run as.
1. Navigate to **Setup** > **Users/Roles** > **User Management** > **Employees** (or **Lists** > **Employees**).
2. Find and edit the employee record you want the integration to run as. This can be an existing user or a dedicated integration user.
3. Go to the **Access** tab.
4. In the **Roles** subtab, click **Add**.
5. Select the custom role from the dropdown.
6. Click **Save**.
If you prefer to use a dedicated integration user rather than an existing employee, create a new user/employee record first, then assign the role as described above. This is recommended for security purposes.
### 7. Create a machine-to-machine certificate mapping
1. Navigate to **Setup** > **Integration** > **OAuth 2.0 Client Credentials (M2M) Setup**.
2. Click **Create New**.
3. Configure the following fields:
* **Entity**: Select the employee/user account the integration will run as (from the previous step)
* **Role**: Select the custom role that the bundle installed. Please note that the role must include the **Log in Using OAuth 2.0 Access Tokens** permission.
* **Application**: Select the integration record you created in step 4.
* **Certificate**: Upload the `cert.pem` file you generated in step 5.
4. Click **Save**.
### 5. Generate a certificate key pair
Open a terminal in the folder where you want to create the files. You need **OpenSSL** available in that environment (macOS and most Linux distributions include it by default). On **Windows**, use **Git Bash** (bundled with [Git for Windows](https://gitforwindows.org/), which includes OpenSSL), **WSL**, or install OpenSSL and ensure it is on your `PATH`.
Run the following commands to generate an EC private key and a self-signed certificate:
```bash theme={null}
openssl ecparam -name prime256v1 -genkey -noout -out private-key.pem
```
```bash theme={null}
openssl req -new -x509 -key private-key.pem -out cert.pem -days 730
```
You will be prompted for certificate details (country, organization, etc.). You can press Enter to accept defaults for all fields.
This produces two files:
* `private-key.pem` — Your private key. You will base64-encode this and share it when installing the integration.
* `cert.pem` — Your public certificate. You will upload this to NetSuite in the next step.
You will then need to base64-encode your private key before sharing it during the installation process. Use the command that matches your environment:
**macOS (Terminal)**
```bash theme={null}
base64 -i private-key.pem
```
**Linux, Git Bash, or WSL**
```bash theme={null}
base64 -w 0 private-key.pem
```
**Windows (PowerShell)**
From the directory that contains `private-key.pem`:
```powershell theme={null}
[Convert]::ToBase64String([IO.File]::ReadAllBytes((Resolve-Path 'private-key.pem')))
```
Copy the encoded string (a long single line, e.g. starting with `LS0tLS1CRUdJTiBFQyBQUklWQVRFIEtFWS0tLS0t...`). It will be required during the installation process.
### 6. Assign the integration role to a user or create a new user
The bundle will include a custom role with the permissions needed for the integration. You need to assign this role to the employee/user account that the integration will run as.
1. Navigate to **Setup** > **Users/Roles** > **User Management** > **Employees** (or **Lists** > **Employees**).
2. Find and edit the employee record you want the integration to run as. This can be an existing user or a dedicated integration user.
3. Go to the **Access** tab.
4. In the **Roles** subtab, click **Add**.
5. Select the custom role from the dropdown.
6. Click **Save**.
If you prefer to use a dedicated integration user rather than an existing employee, create a new user/employee record first, then assign the role as described above. This is recommended for security purposes.
### 7. Create a machine-to-machine certificate mapping
1. Navigate to **Setup** > **Integration** > **OAuth 2.0 Client Credentials (M2M) Setup**.
2. Click **Create New**.
3. Configure the following fields:
* **Entity**: Select the employee/user account the integration will run as (from the previous step)
* **Role**: Select the custom role that the bundle installed. Please note that the role must include the **Log in Using OAuth 2.0 Access Tokens** permission.
* **Application**: Select the integration record you created in step 4.
* **Certificate**: Upload the `cert.pem` file you generated in step 5.
4. Click **Save**.
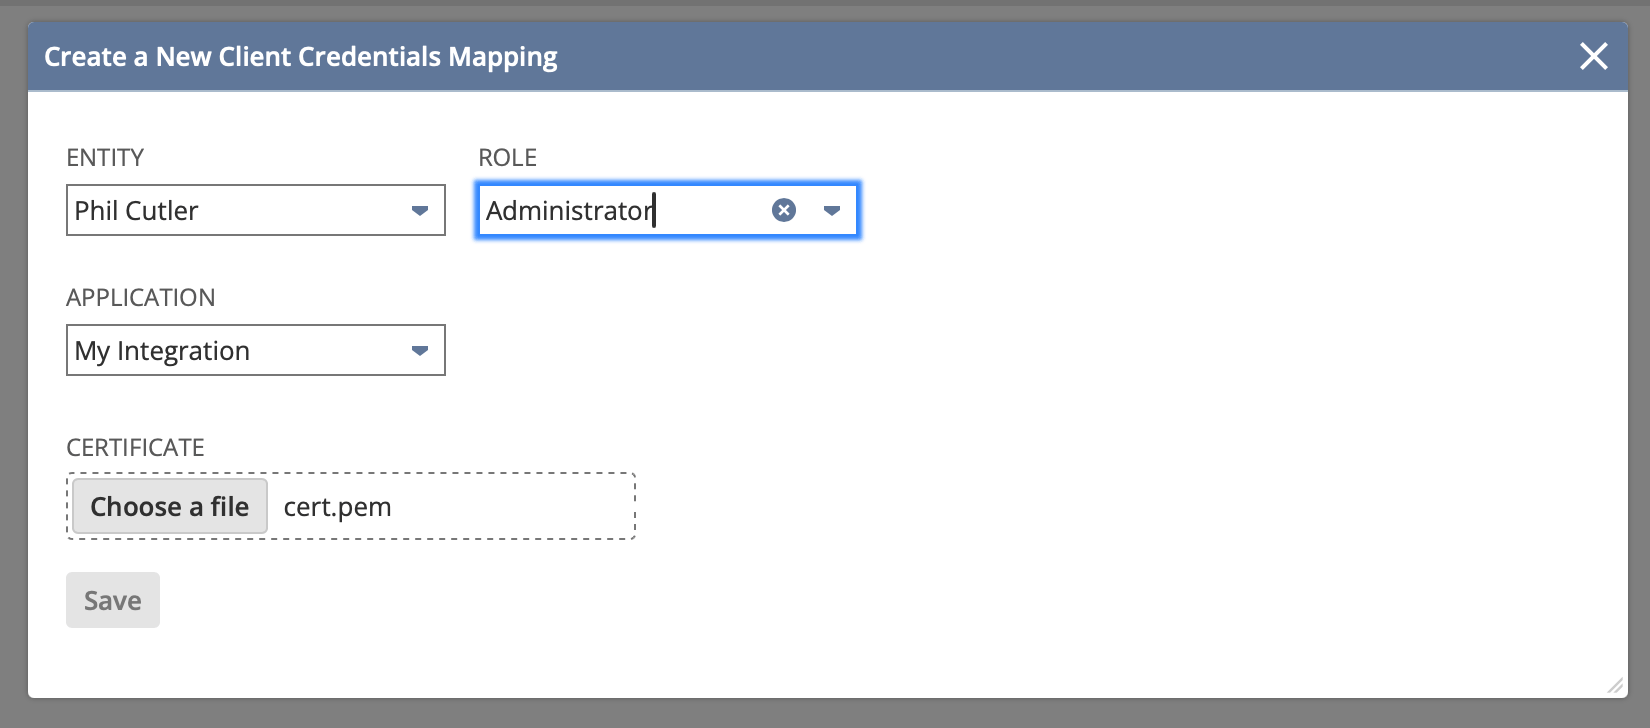 5. Copy the **Certificate ID** from the list — you will need this value when installing the integration.
 Check that the `Valid Until` date for the certificate is two years in the future. NetSuite allows a maximum validity of 730 days.
## Installing the integration
When you are installing the integration, you will be prompted for a number of inputs:
Check that the `Valid Until` date for the certificate is two years in the future. NetSuite allows a maximum validity of 730 days.
## Installing the integration
When you are installing the integration, you will be prompted for a number of inputs:
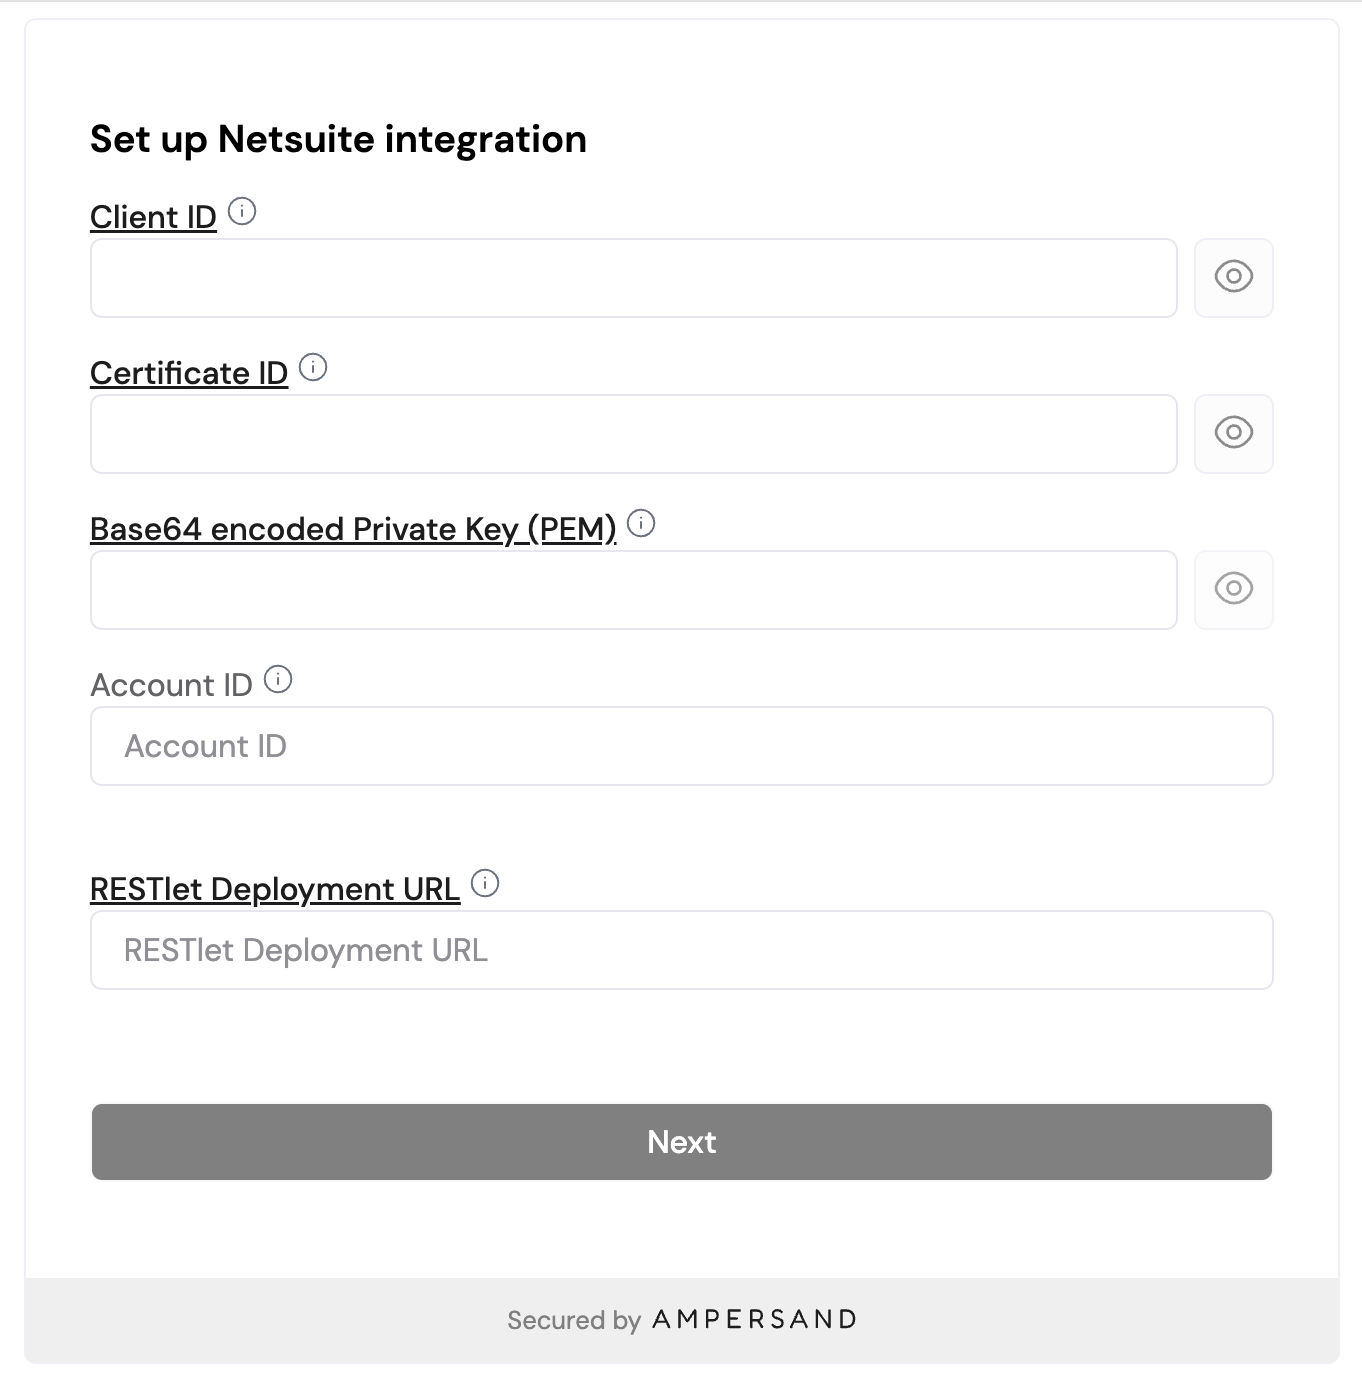 Here is where to find each value:
| Input | Where to find it |
| -------------------------- | ------------------------------------------------------------------------------------------------------------------------------------------------- |
| **Client ID** | The Consumer Key from step 2. |
| **Certificate ID** | From step 4. |
| **Private Key** | Base64-encoded contents of `private-key.pem` (from step 3) |
| **Account ID** | Your NetSuite URL (e.g. `https://1234567.app.netsuite.com` → Account ID is `1234567`), or **Setup** > **Company** > **Company Information**. |
| **RESTlet Deployment URL** | This is printed out in the Deployments tab of the script (see previous step), and looks like `/app/site/hosting/restlet.nl?script=3045&deploy=1`. |
**Sandbox accounts**: If you are connecting a sandbox account, your Account ID may contain an underscore and suffix (e.g. `1234567_SB1`). Provide it exactly as shown in your NetSuite URL or Company Information page.
Here is where to find each value:
| Input | Where to find it |
| -------------------------- | ------------------------------------------------------------------------------------------------------------------------------------------------- |
| **Client ID** | The Consumer Key from step 2. |
| **Certificate ID** | From step 4. |
| **Private Key** | Base64-encoded contents of `private-key.pem` (from step 3) |
| **Account ID** | Your NetSuite URL (e.g. `https://1234567.app.netsuite.com` → Account ID is `1234567`), or **Setup** > **Company** > **Company Information**. |
| **RESTlet Deployment URL** | This is printed out in the Deployments tab of the script (see previous step), and looks like `/app/site/hosting/restlet.nl?script=3045&deploy=1`. |
**Sandbox accounts**: If you are connecting a sandbox account, your Account ID may contain an underscore and suffix (e.g. `1234567_SB1`). Provide it exactly as shown in your NetSuite URL or Company Information page.