> ## Documentation Index
> Fetch the complete documentation index at: https://ampersand-24eb5c1a-odoo-deep.mintlify.site/llms.txt
> Use this file to discover all available pages before exploring further.
# HubSpot
## What's Supported
### Supported Actions
The Hubspot connector supports:
* [Read Actions](/read-actions), including full historic backfill, incremental reads, and filters.
* [Subscribe Actions](/subscribe-actions). Please note that [special set up](/subscribe-actions#special-set-up-for-hubspot) is needed for HubSpot.
* [Write Actions](/write-actions), including Bulk Write and Delete.
* [Proxy Actions](/proxy-actions), using the base URL `https://api.hubapi.com`.
### Supported Objects
The Hubspot connector supports writing to and reading from the following objects:
* [companies](https://developers.hubspot.com/docs/api/crm/companies)
* [contacts](https://developers.hubspot.com/docs/api/crm/contacts)
* [deals](https://developers.hubspot.com/docs/api/crm/deals)
* [emails](https://developers.hubspot.com/docs/guides/api/crm/engagements/email)
* [calls](https://developers.hubspot.com/docs/guides/api/crm/engagements/calls)
* [meetings](https://developers.hubspot.com/docs/guides/api/crm/engagements/meetings)
* [notes](https://developers.hubspot.com/docs/guides/api/crm/engagements/notes)
* All other [standard CRM objects](https://developers.hubspot.com/docs/guides/api/crm/understanding-the-crm#object-type-ids)
* Custom CRM objects
For each of these objects, the connector supports standard fields ([list of standard fields](https://docs.google.com/spreadsheets/d/1FGc9zT_J9dyGghDxvqeioAva-5Gj7-2DQzKNMrbrPvw/view?usp=sharing)) and custom fields.
The Hubspot connector only supports reading from:
* [lists](https://developers.hubspot.com/docs/guides/api/crm/lists/overview) (note: incremental reads not supported for Lists)
* Users and owners (see below)
#### Reading users and owners
To read users from your customer's HubSpot workspace, enable the `crm.objects.users.read` scope and add `users` as an object in `amp.yaml`:
```YAML theme={null}
- objectName: users
destination: defaultWebhook
schedule: "0 0 * * *"
requiredFields:
- fieldName: hs_object_id
mapToName: userId
- fieldName: hubspot_owner_id
mapToName: ownerId
- fieldName: hs_email
mapToName: emailAddress
```
### Associations
HubSpot associations is a private preview feature where you can retrieve associated records when using Read Actions or Subscribe Actions. Please contact [support@withampersand.com](mailto:support@withampersand.com) if you wish to use it.
### Example Integration
For an example manifest file, visit our [samples repo on Github](https://github.com/amp-labs/samples/blob/main/hubspot/amp.yaml).
## Before You Get Started
If you don't already have one, sign up for a [free HubSpot developer account](https://app.hubspot.com/signup-hubspot/crm?intent=developer).
## Create a HubSpot App
### Method 1: New Project Apps
New Project Apps are [limited to 25 installs](https://developers.hubspot.com/changelog/new-marketplace-distribution-app-install-limits), until the app is listed on the HubSpot Marketplace. We recommend starting the process to [publish to HubSpot marketplace](#publish-to-hubspot-marketplace) as soon you've finished building your integration and tested it internally or with a customer.
To create a New Project App:
1. **Open** the terminal
2. **Install** the HubSpot CLI: `npm install -g @hubspot/cli`
3. **Authenticate** using `hs account auth` and select open HubSpot to get your key
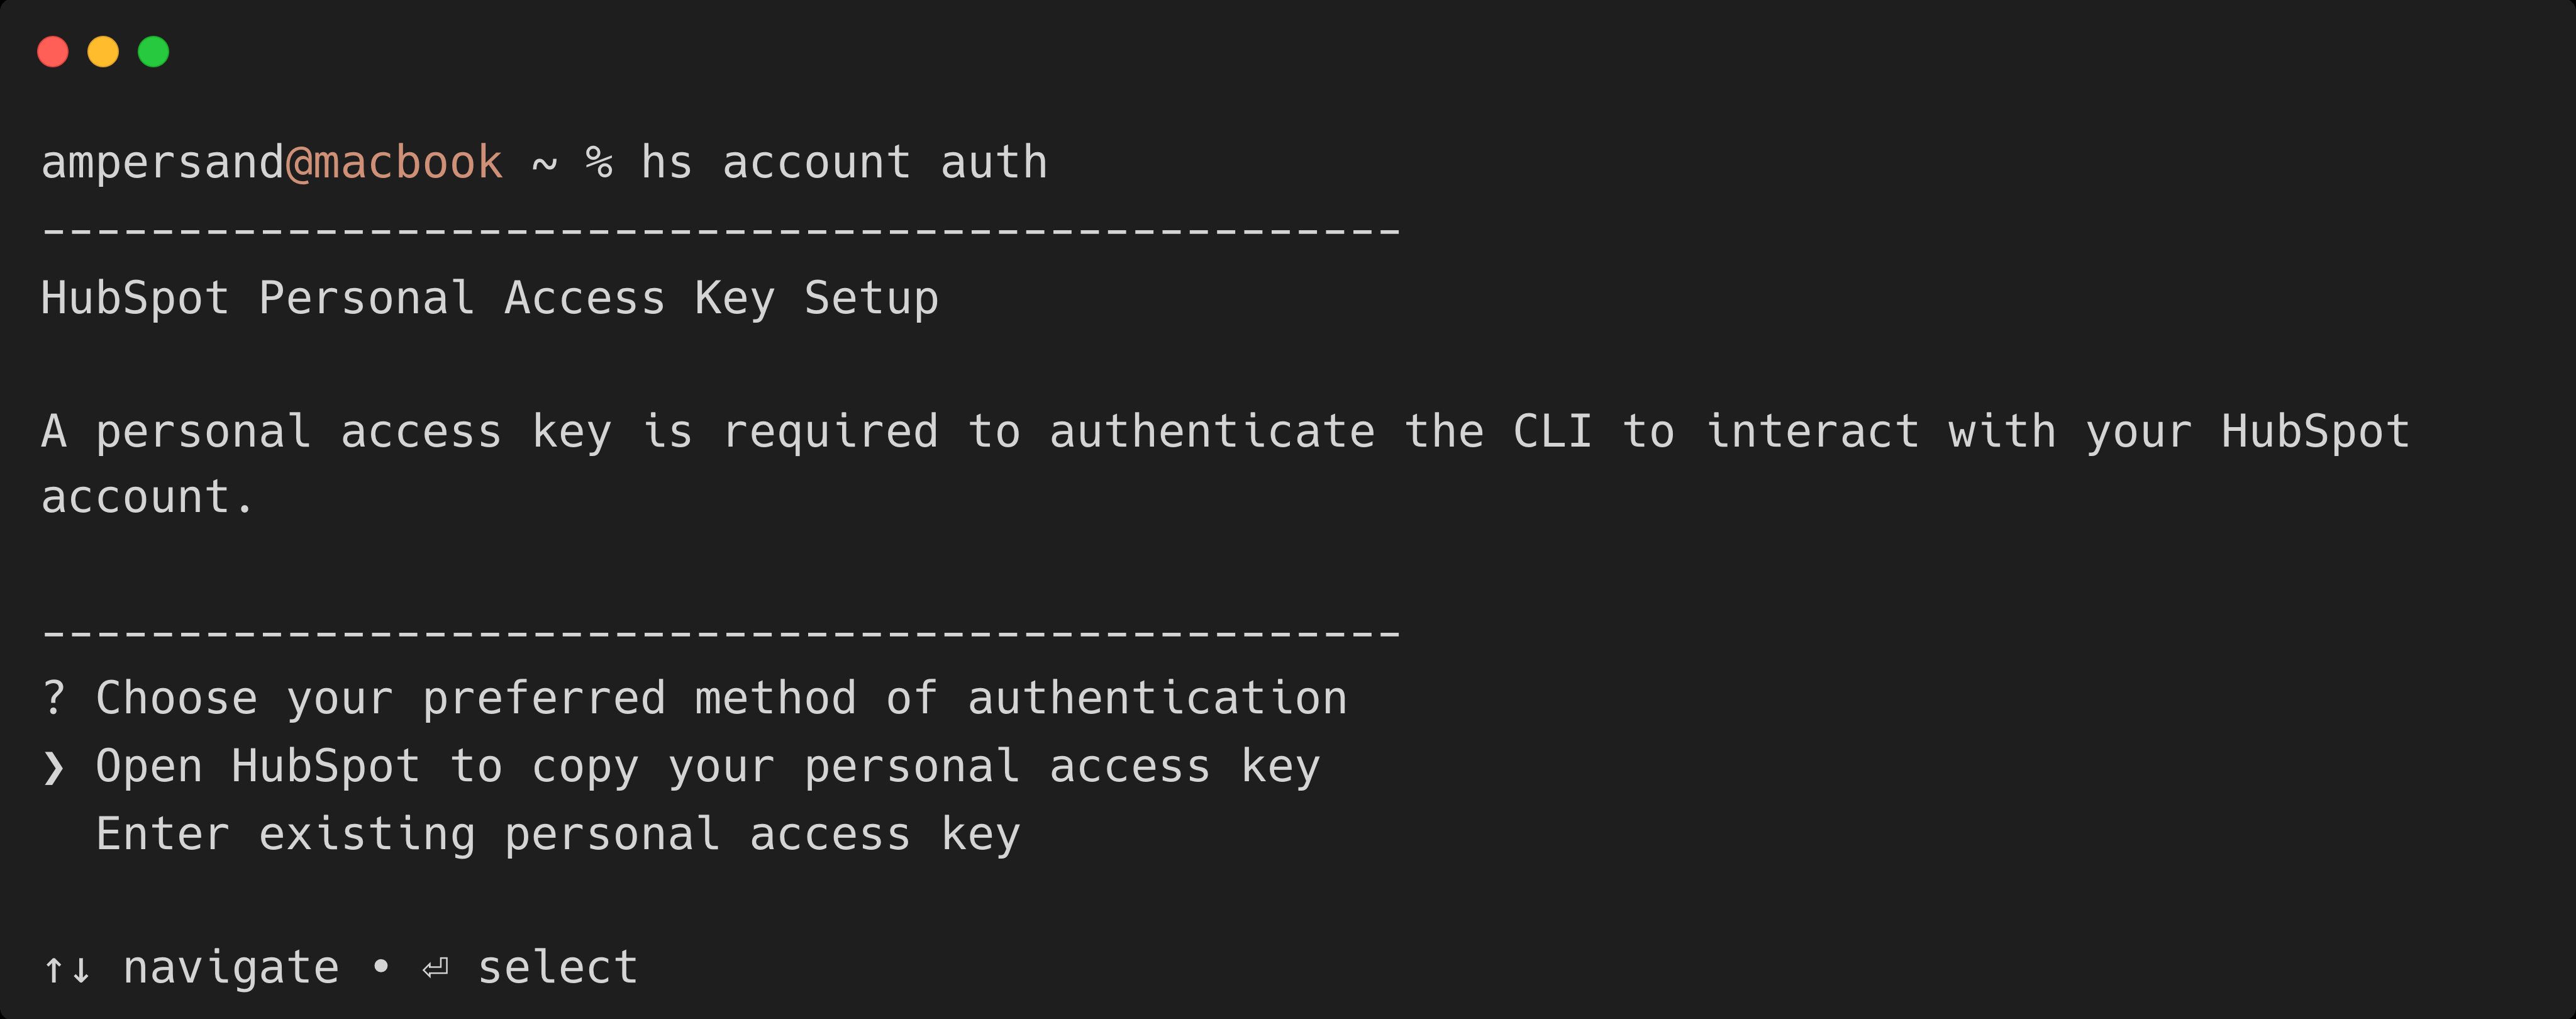 If you already have a personal access key, select "Enter existing personal
access key" and skip to [Step 7](#create-project).
4. **Select** your account (if prompted)
If you have multiple accounts, make sure to select the developer account.
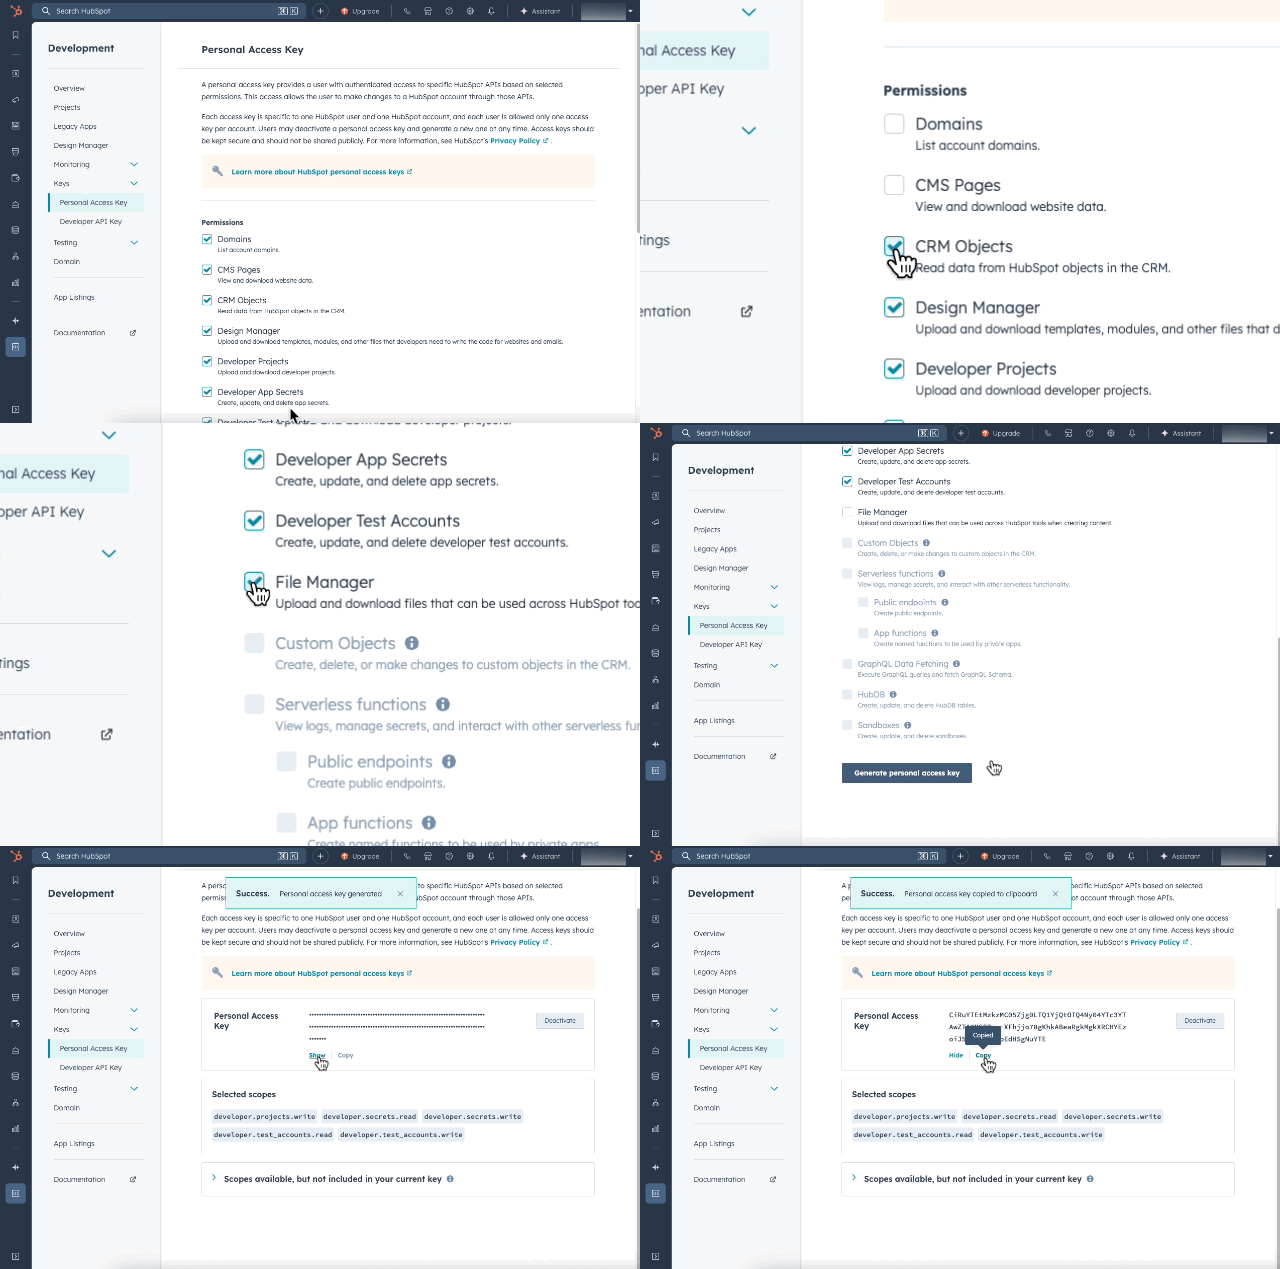
5. **Create** your Personal Access Key and copy it
If you already have a personal access key, select "Enter existing personal
access key" and skip to [Step 7](#create-project).
4. **Select** your account (if prompted)
If you have multiple accounts, make sure to select the developer account.
5. **Create** your Personal Access Key and copy it
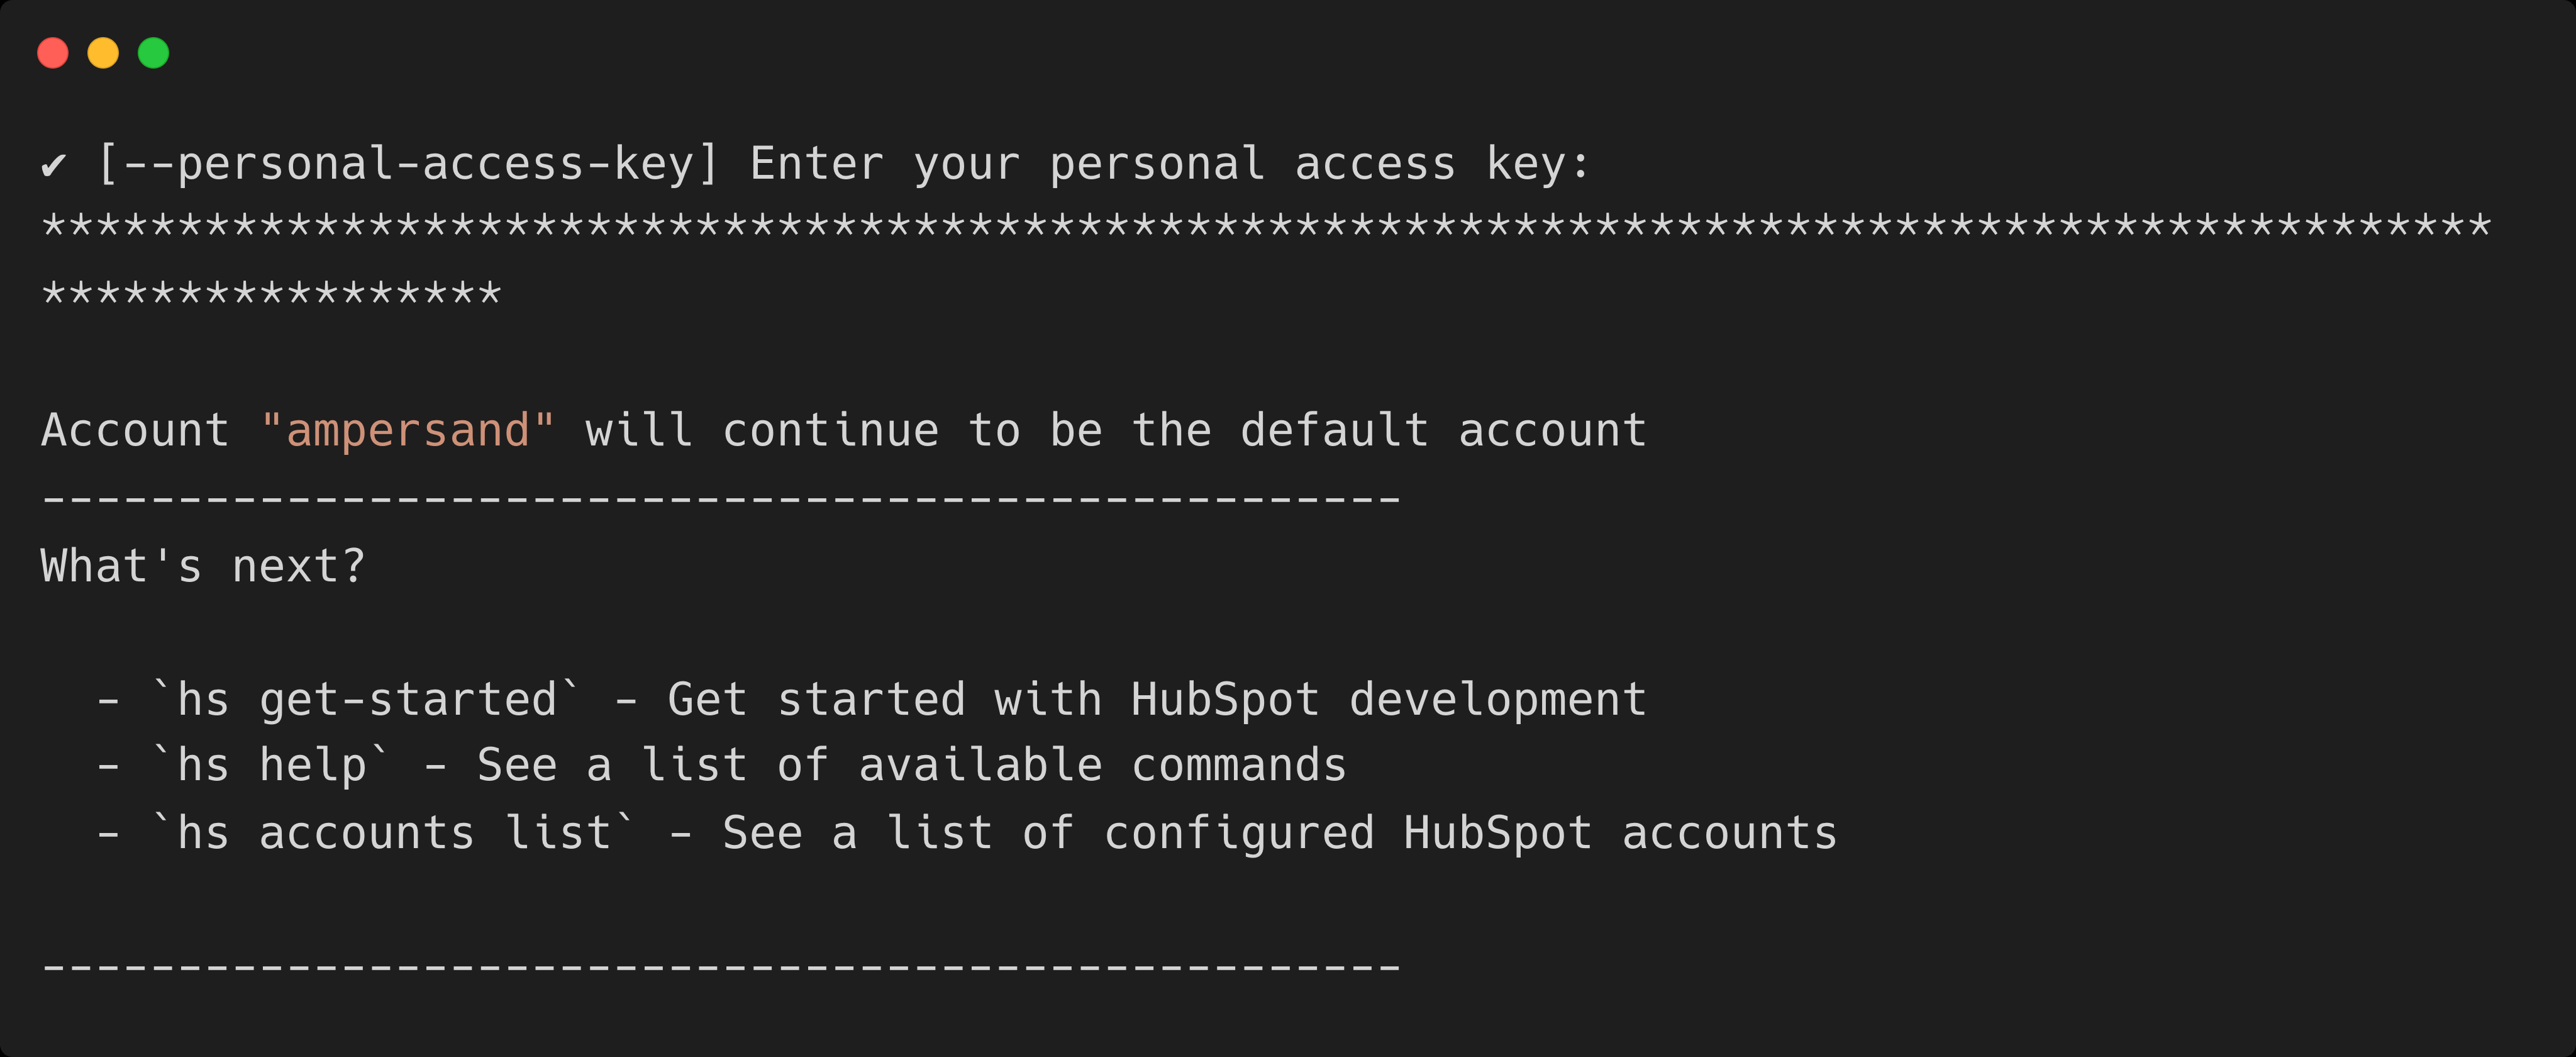
 6. **Go back** to terminal, **paste** the key and **hit Enter**
 7. Create a project:
Copy and paste this command in the terminal:
```
hs project create --name your-project-name --project-base app --distribution marketplace --auth oauth --features
```
8. Configure OAuth redirect URL and scopes
Open the folder where the HubSpot project was created and edit `src/app/app-hsmeta.json`.
Replace the `auth` section of the file with the snippet below. If you wish to read or write to more objects than **contacts**, then add more scopes. For example, if you also want to read **companies**, then you can add the following scopes:
* crm.objects.companies.read
For a full list of HubSpot scopes, please refer to [HubSpot documentation](https://developers.hubspot.com/docs/apps/developer-platform/build-apps/authentication/scopes#list-of-available-scopes).
```json theme={null}
{
"auth": {
"type": "oauth",
"redirectUrls": ["https://api.withampersand.com/callbacks/v1/oauth"],
"requiredScopes": [
"oauth",
"crm.objects.contacts.read",
"crm.objects.contacts.write"
],
"optionalScopes": [],
"conditionallyRequiredScopes": []
}
}
```
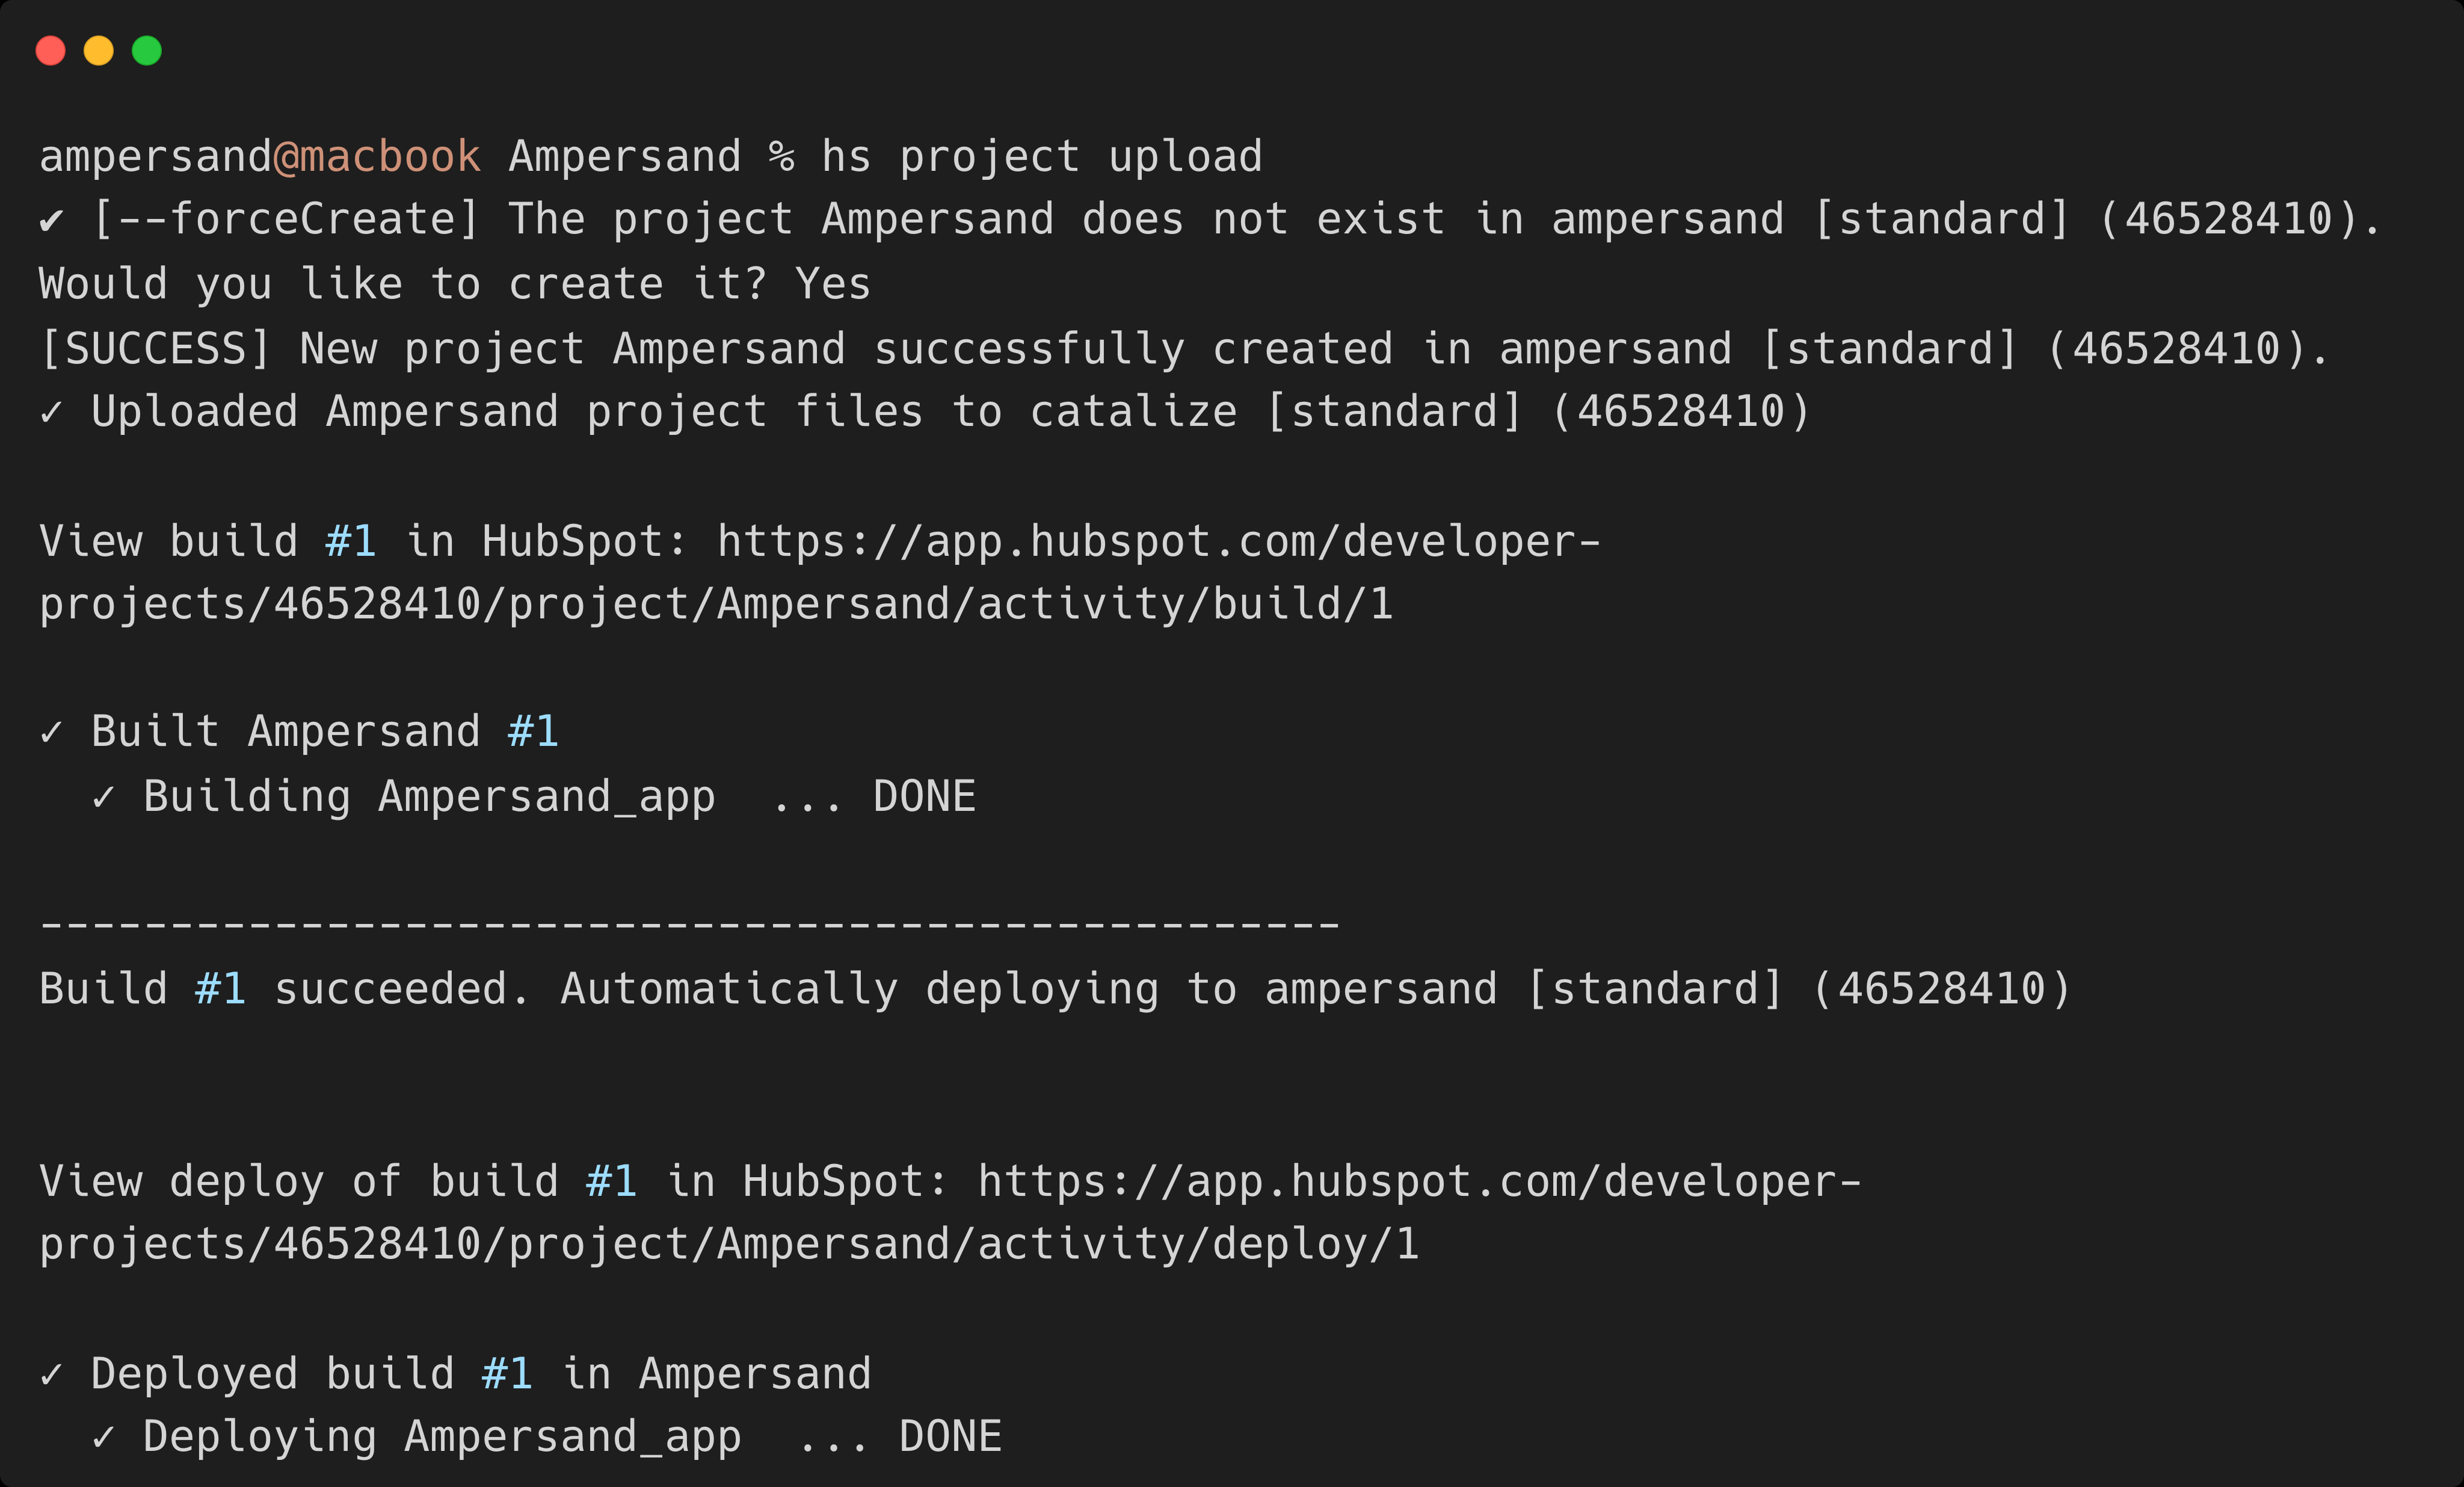
9. **Deploy**: run the following command
```
hs project upload
```
You will be prompted to create the new project, select "yes".
7. Create a project:
Copy and paste this command in the terminal:
```
hs project create --name your-project-name --project-base app --distribution marketplace --auth oauth --features
```
8. Configure OAuth redirect URL and scopes
Open the folder where the HubSpot project was created and edit `src/app/app-hsmeta.json`.
Replace the `auth` section of the file with the snippet below. If you wish to read or write to more objects than **contacts**, then add more scopes. For example, if you also want to read **companies**, then you can add the following scopes:
* crm.objects.companies.read
For a full list of HubSpot scopes, please refer to [HubSpot documentation](https://developers.hubspot.com/docs/apps/developer-platform/build-apps/authentication/scopes#list-of-available-scopes).
```json theme={null}
{
"auth": {
"type": "oauth",
"redirectUrls": ["https://api.withampersand.com/callbacks/v1/oauth"],
"requiredScopes": [
"oauth",
"crm.objects.contacts.read",
"crm.objects.contacts.write"
],
"optionalScopes": [],
"conditionallyRequiredScopes": []
}
}
```
9. **Deploy**: run the following command
```
hs project upload
```
You will be prompted to create the new project, select "yes".
 10. Accept HubSpot's Acceptable Use Policy
If this is your first time create a HubSpot app, you will need to accept HubSpot's Acceptable Use Policy before any users can install your integration.
* Log into HubSpot
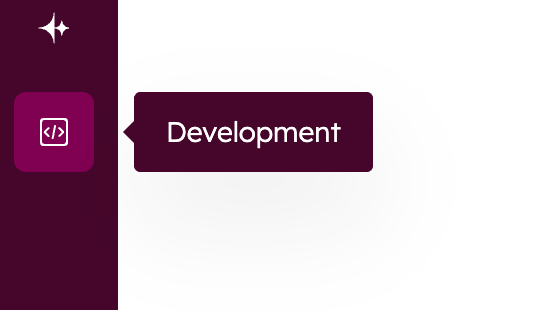
* Select **Development** from the bottom of the left nav bar.
10. Accept HubSpot's Acceptable Use Policy
If this is your first time create a HubSpot app, you will need to accept HubSpot's Acceptable Use Policy before any users can install your integration.
* Log into HubSpot
* Select **Development** from the bottom of the left nav bar.
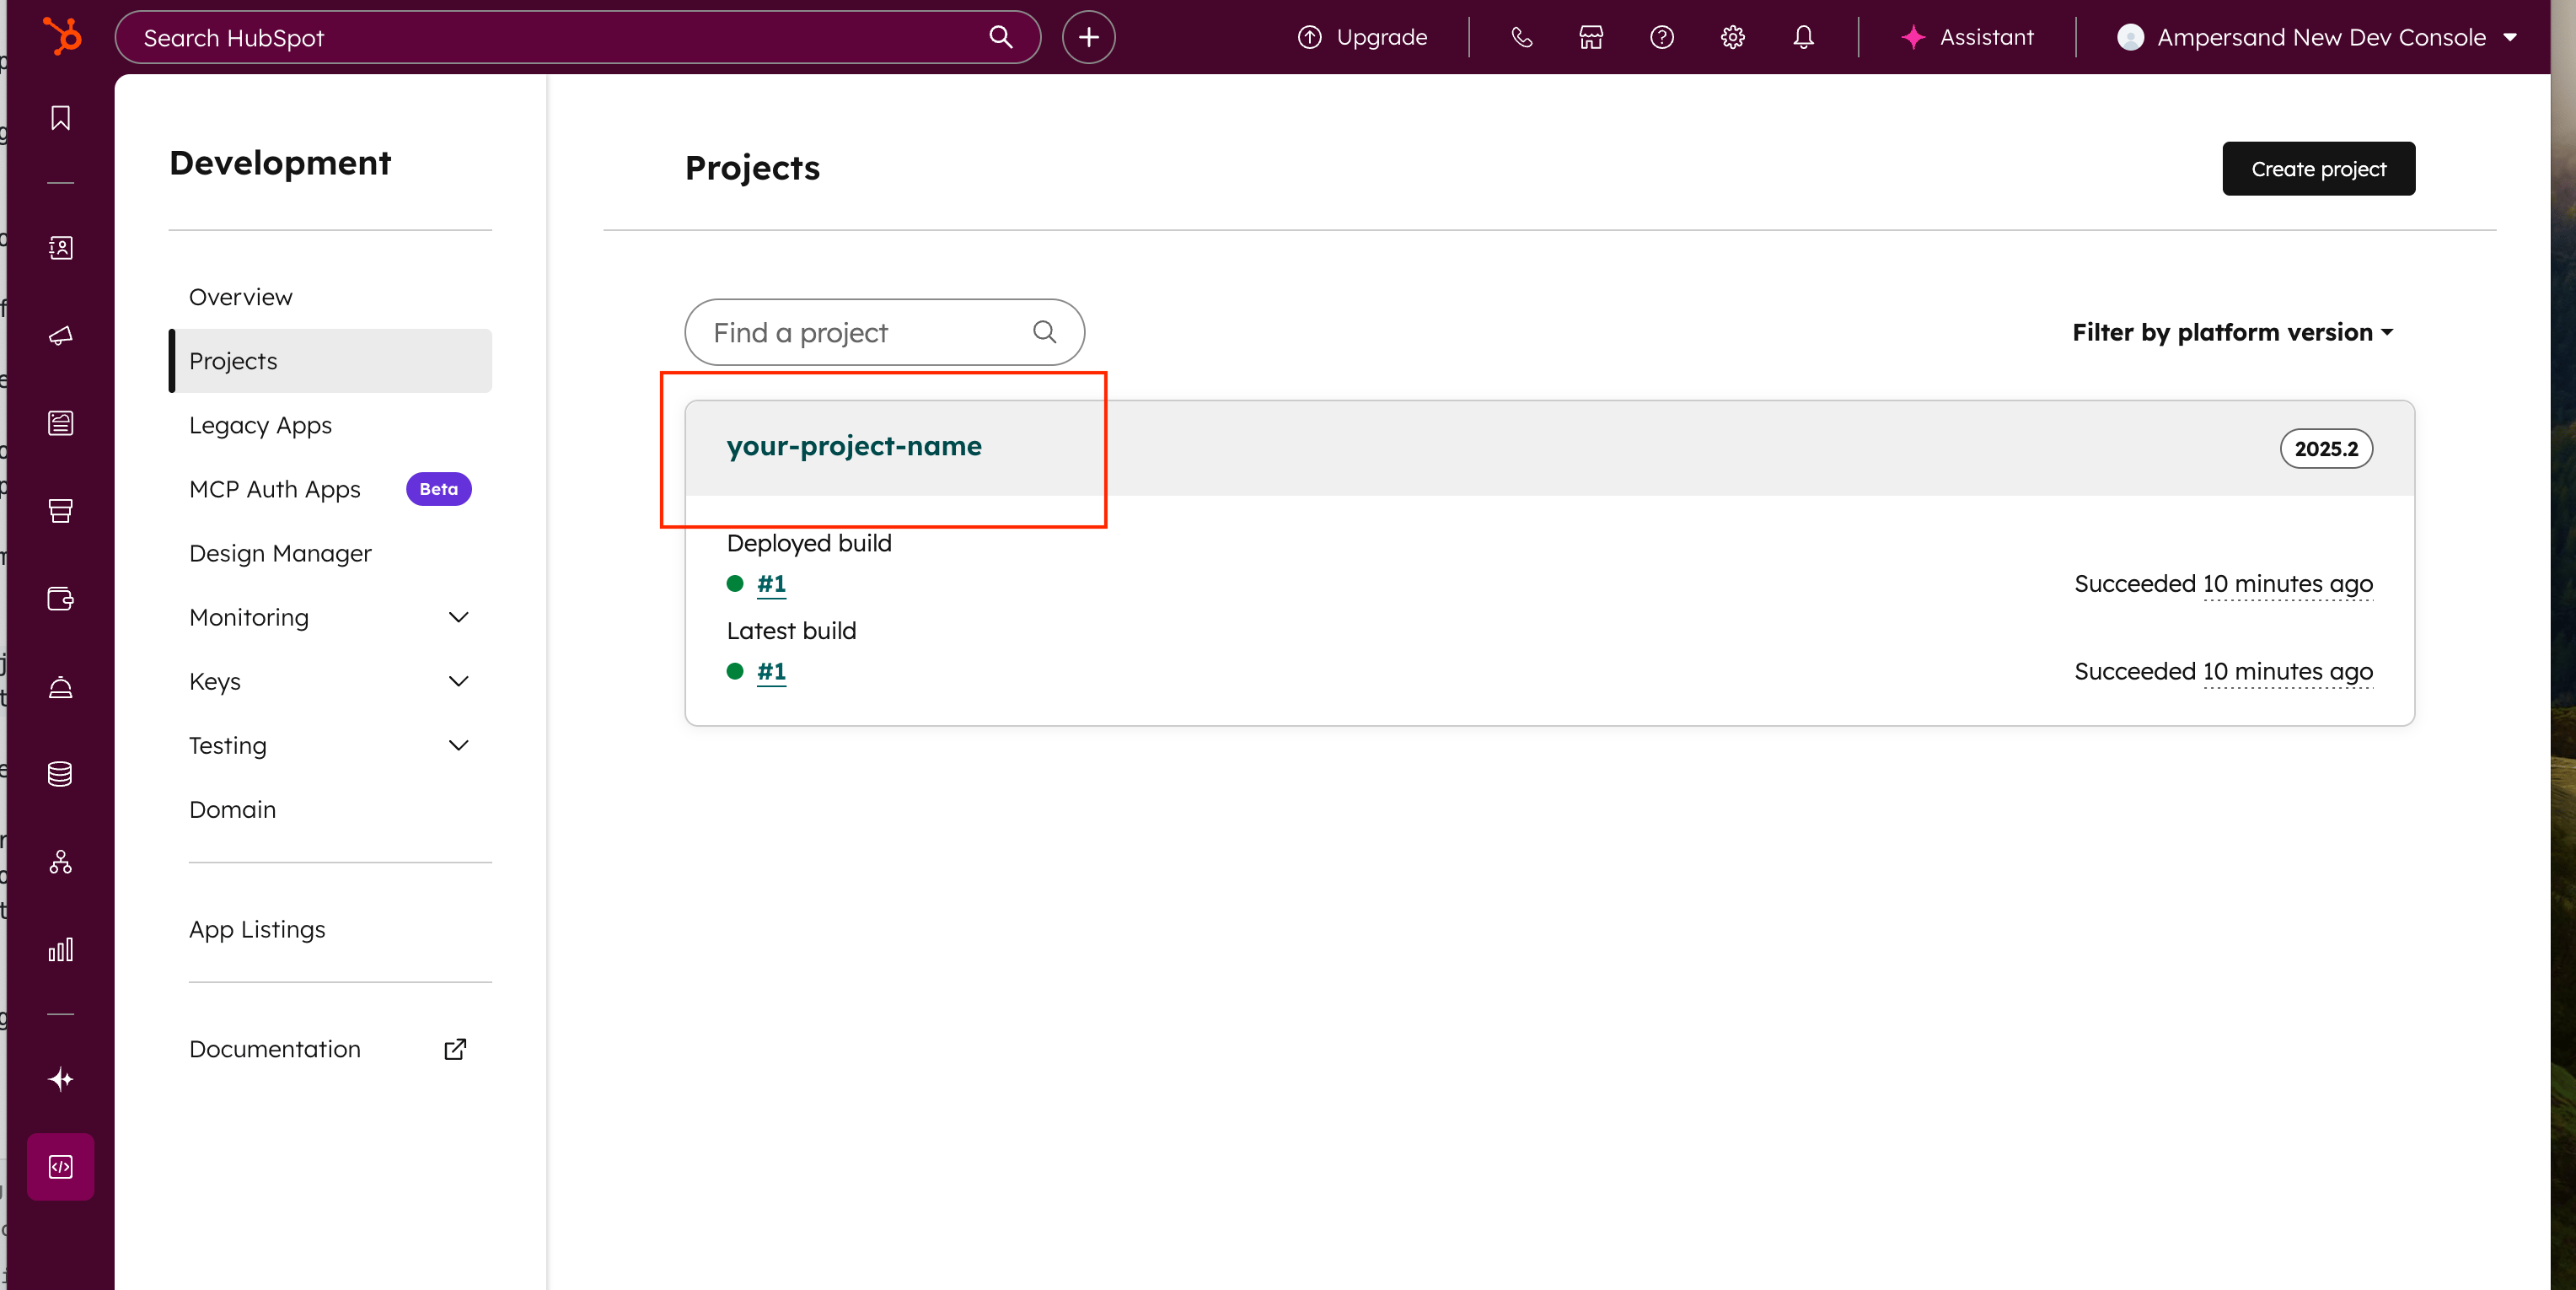
 * Select the project you just created
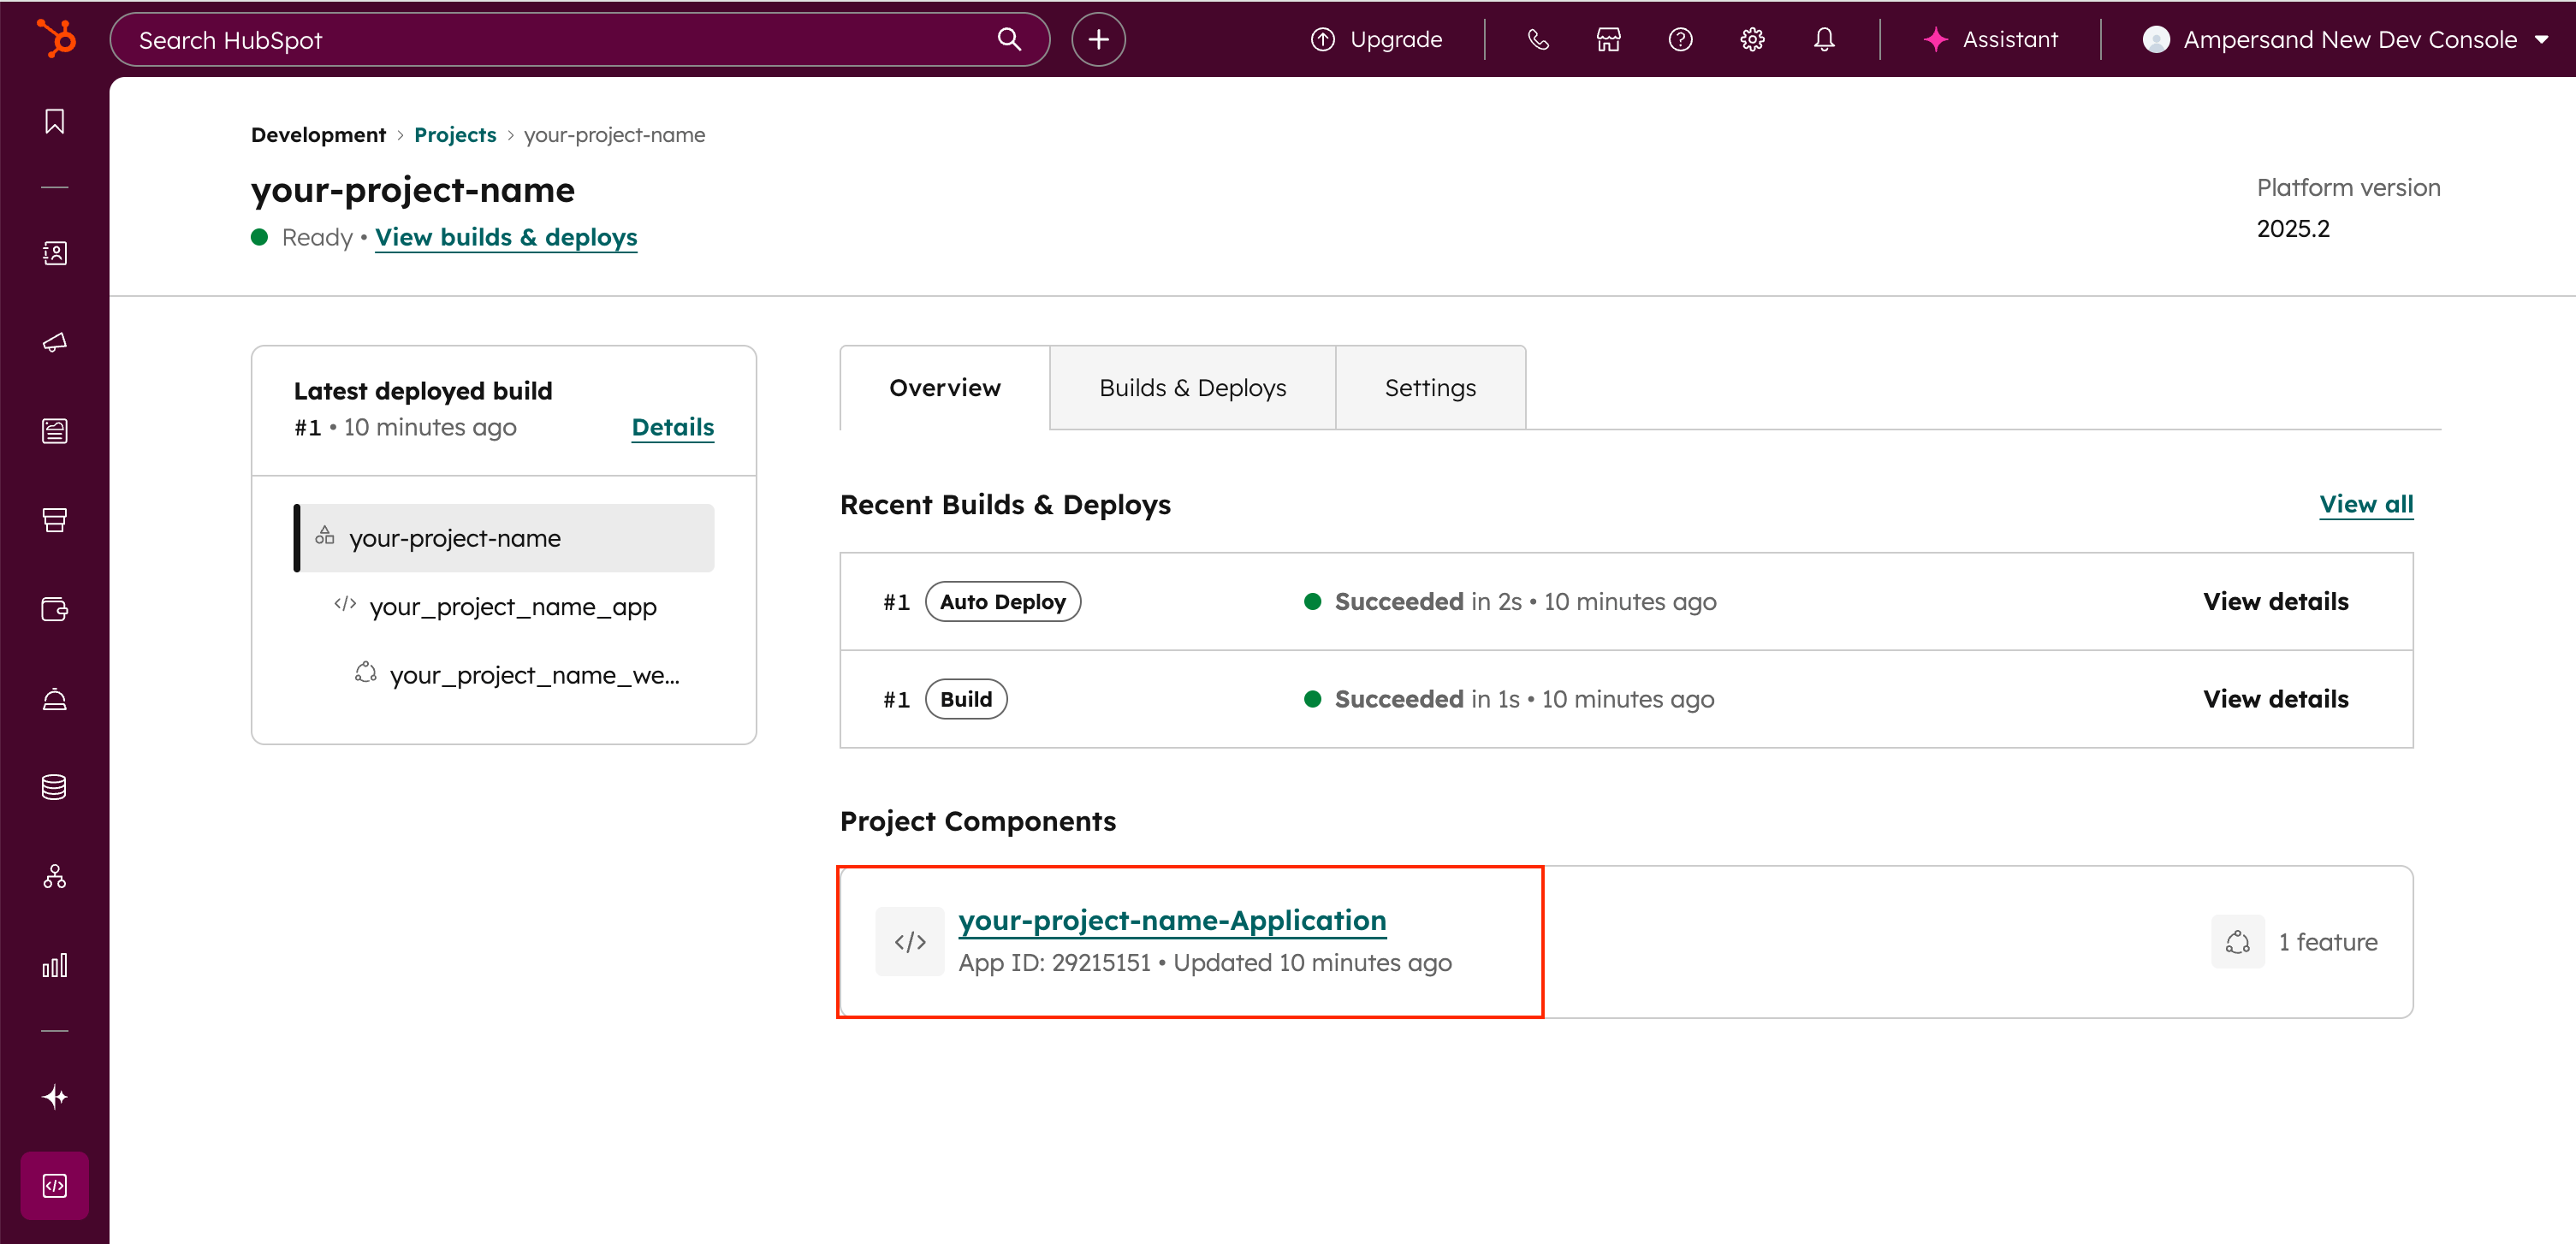
 * In the **Project Components** section, click on the app.
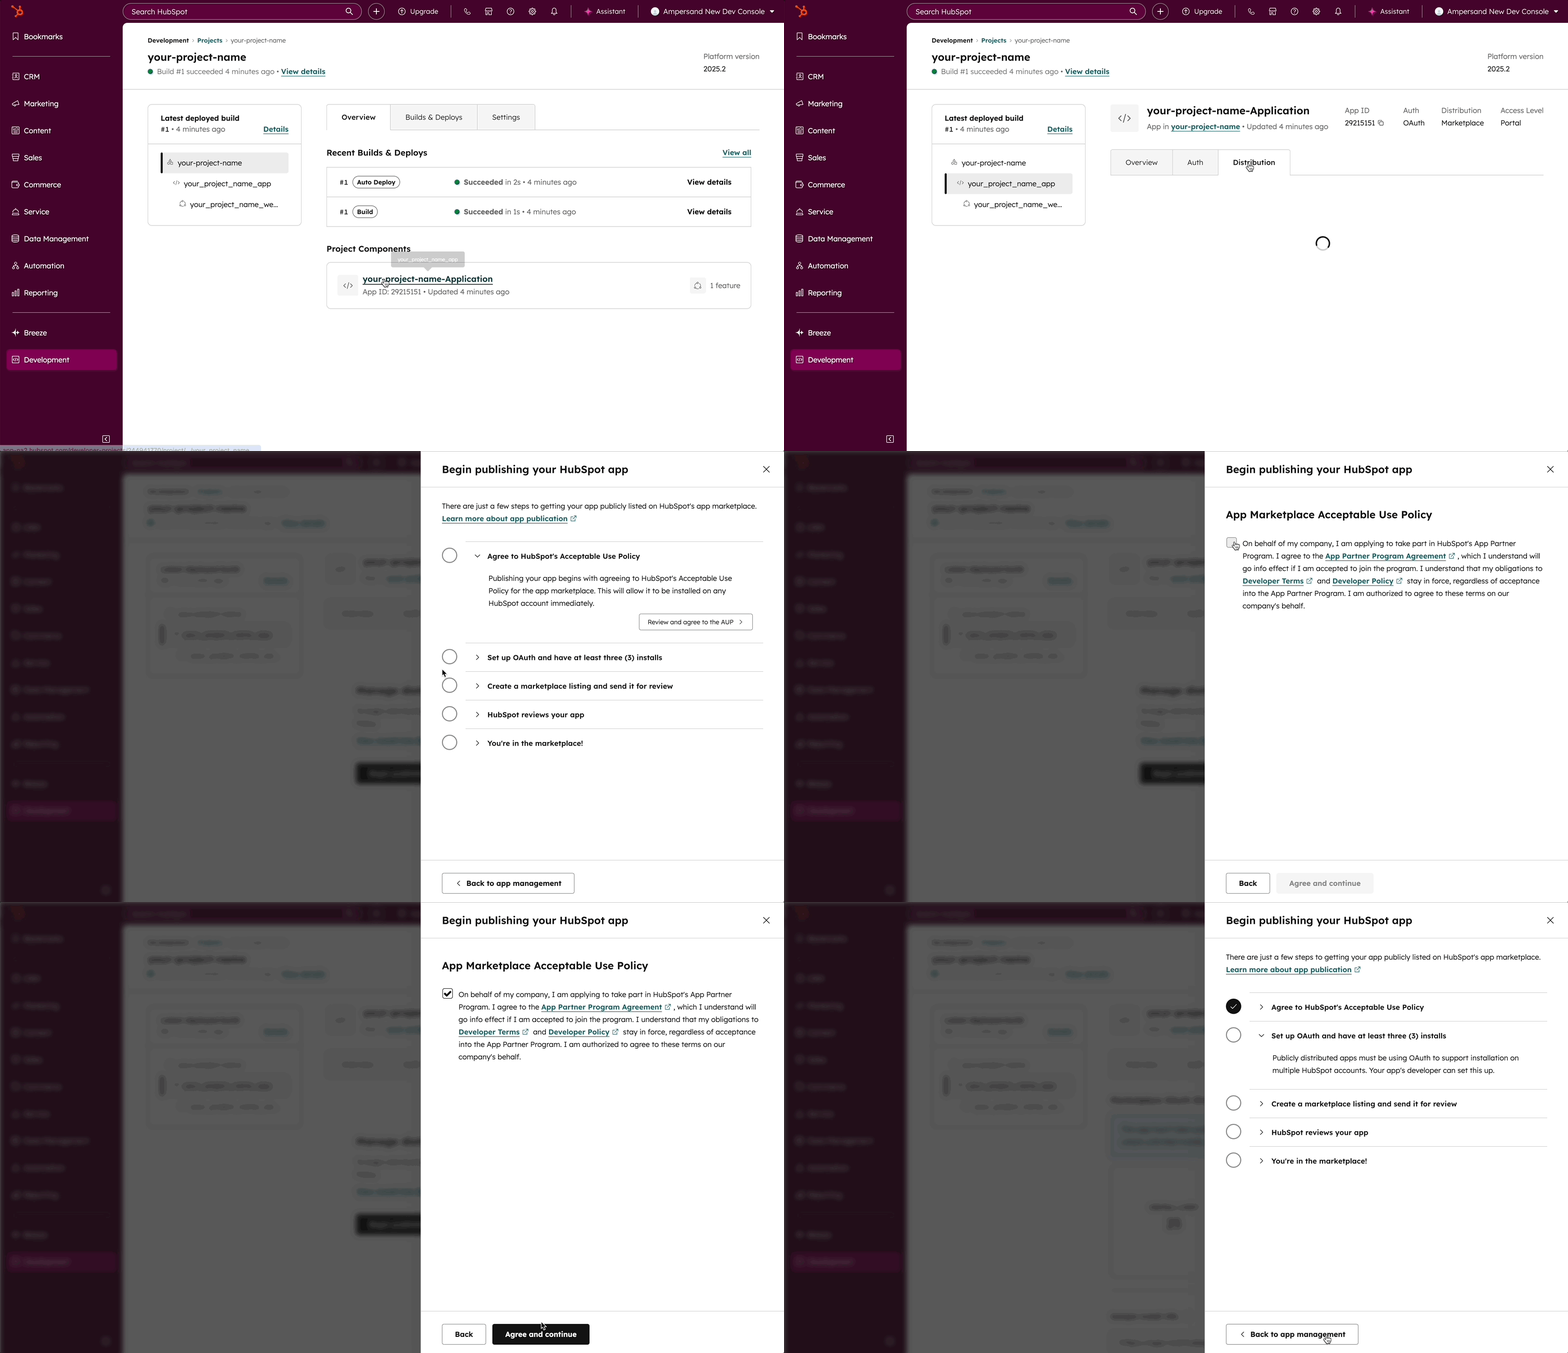
 * Navigate to the **Distribution** tab, click on "Begin Publishing" and complete the first step "Agree to HubSpot's Acceptable Use Policy". You do not need to complete the rest of the steps right now.
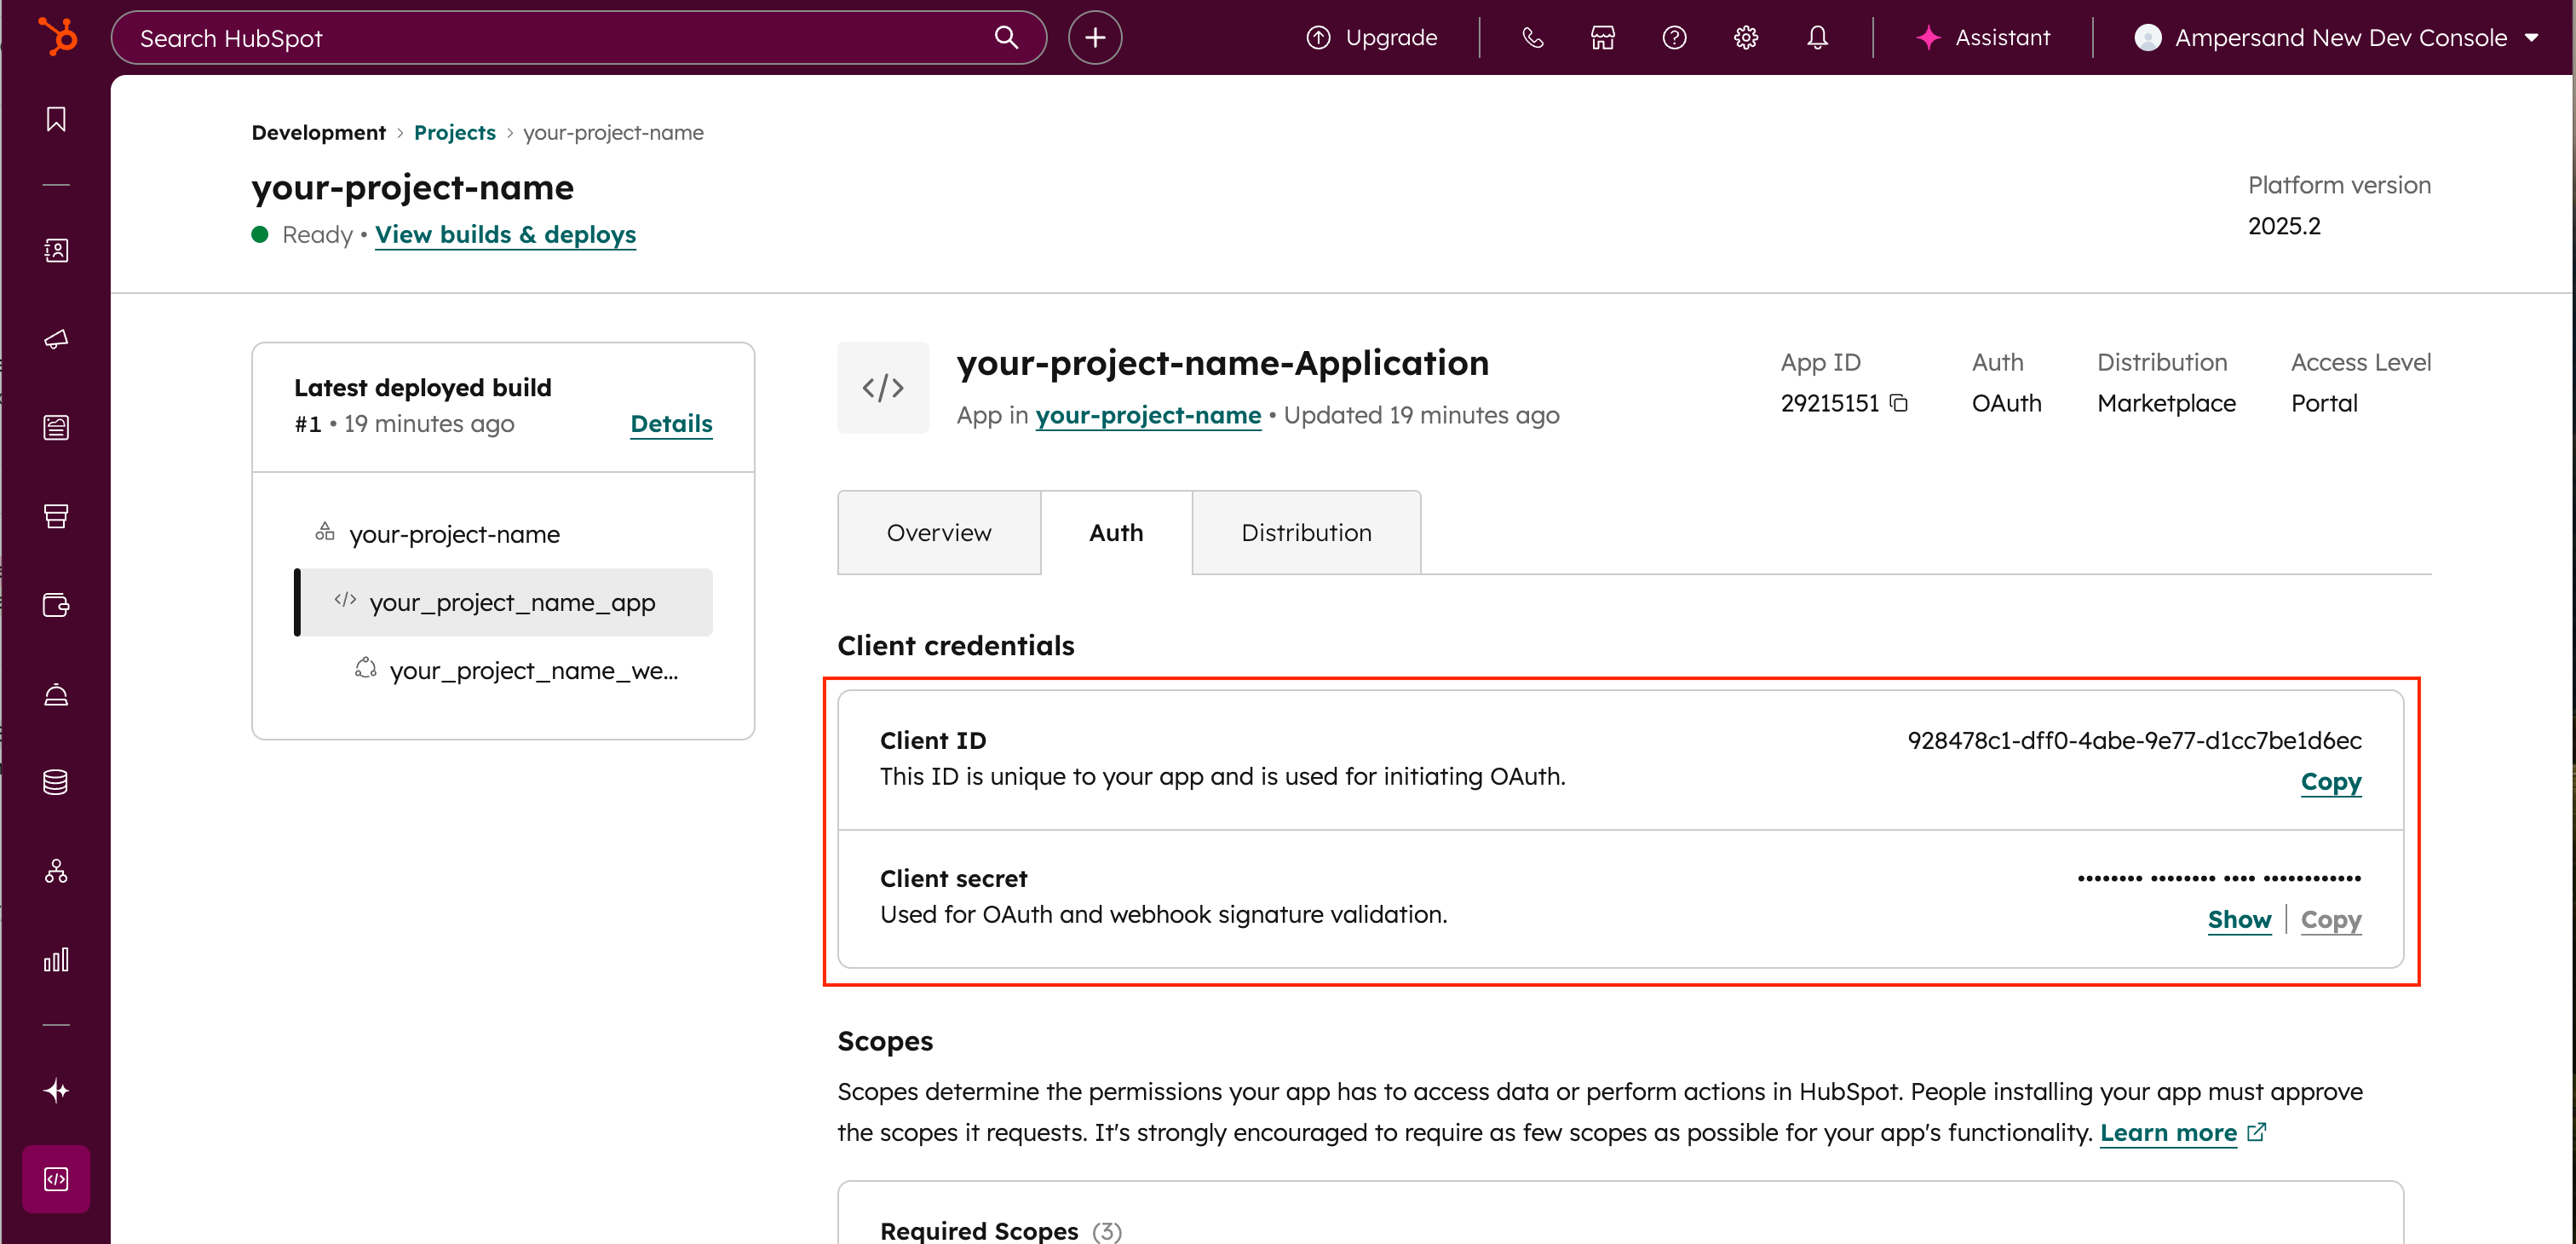
 11. Get Client ID and Client Secret
* Follow the steps from Step 10 above to navigate to your HubSpot app.
* Go to the **Auth** tab to find your **Client ID** and **Client Secret**
11. Get Client ID and Client Secret
* Follow the steps from Step 10 above to navigate to your HubSpot app.
* Go to the **Auth** tab to find your **Client ID** and **Client Secret**
 12. Jump to [Add App to Ampersand](#add-app-to-ampersand).
### Method 2: Legacy Apps
Legacy Apps has no install limits but [won't receive
new HubSpot
features](https://developers.hubspot.com/docs/apps/developer-platform/build-apps/overview).
When you migrate a Legacy App to a new Project App, you will be subject to the 25 install limit until your app is listed in the HubSpot marketplace. Please see [HubSpot changelog](https://developers.hubspot.com/changelog/new-marketplace-distribution-app-install-limits) for more details.
Depending on when you created your HubSpot developer account, you will see different UI.
#### Developer accounts created after September 2025
1. Log in to your HubSpot developer account
2. Navigate to **Development** → **Legacy apps**
12. Jump to [Add App to Ampersand](#add-app-to-ampersand).
### Method 2: Legacy Apps
Legacy Apps has no install limits but [won't receive
new HubSpot
features](https://developers.hubspot.com/docs/apps/developer-platform/build-apps/overview).
When you migrate a Legacy App to a new Project App, you will be subject to the 25 install limit until your app is listed in the HubSpot marketplace. Please see [HubSpot changelog](https://developers.hubspot.com/changelog/new-marketplace-distribution-app-install-limits) for more details.
Depending on when you created your HubSpot developer account, you will see different UI.
#### Developer accounts created after September 2025
1. Log in to your HubSpot developer account
2. Navigate to **Development** → **Legacy apps**
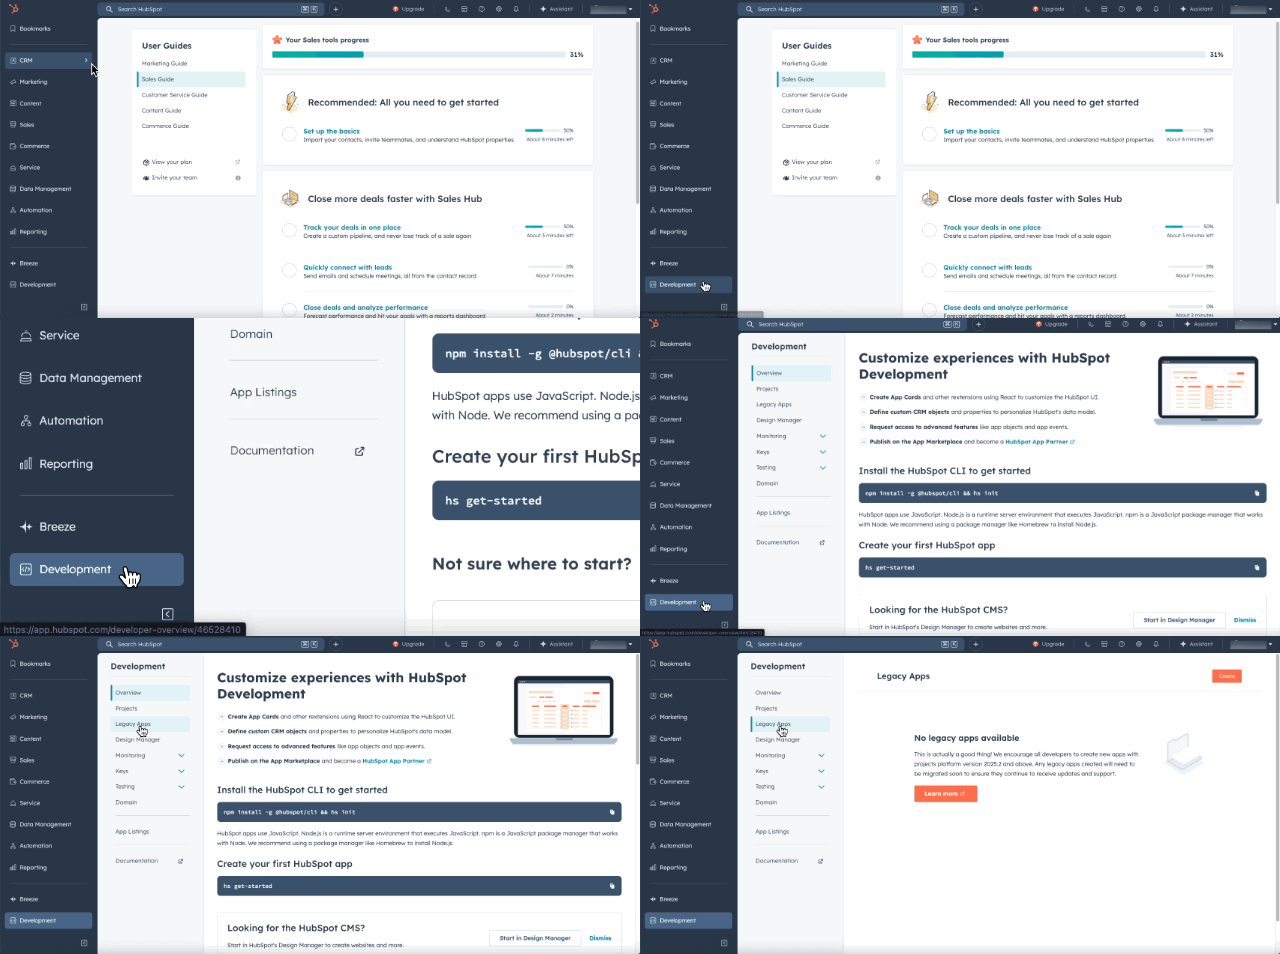 If you don't see the Development menu, you need Super Admin permissions.
3. Click **Create** → Select **Public**
If you don't see the Development menu, you need Super Admin permissions.
3. Click **Create** → Select **Public**
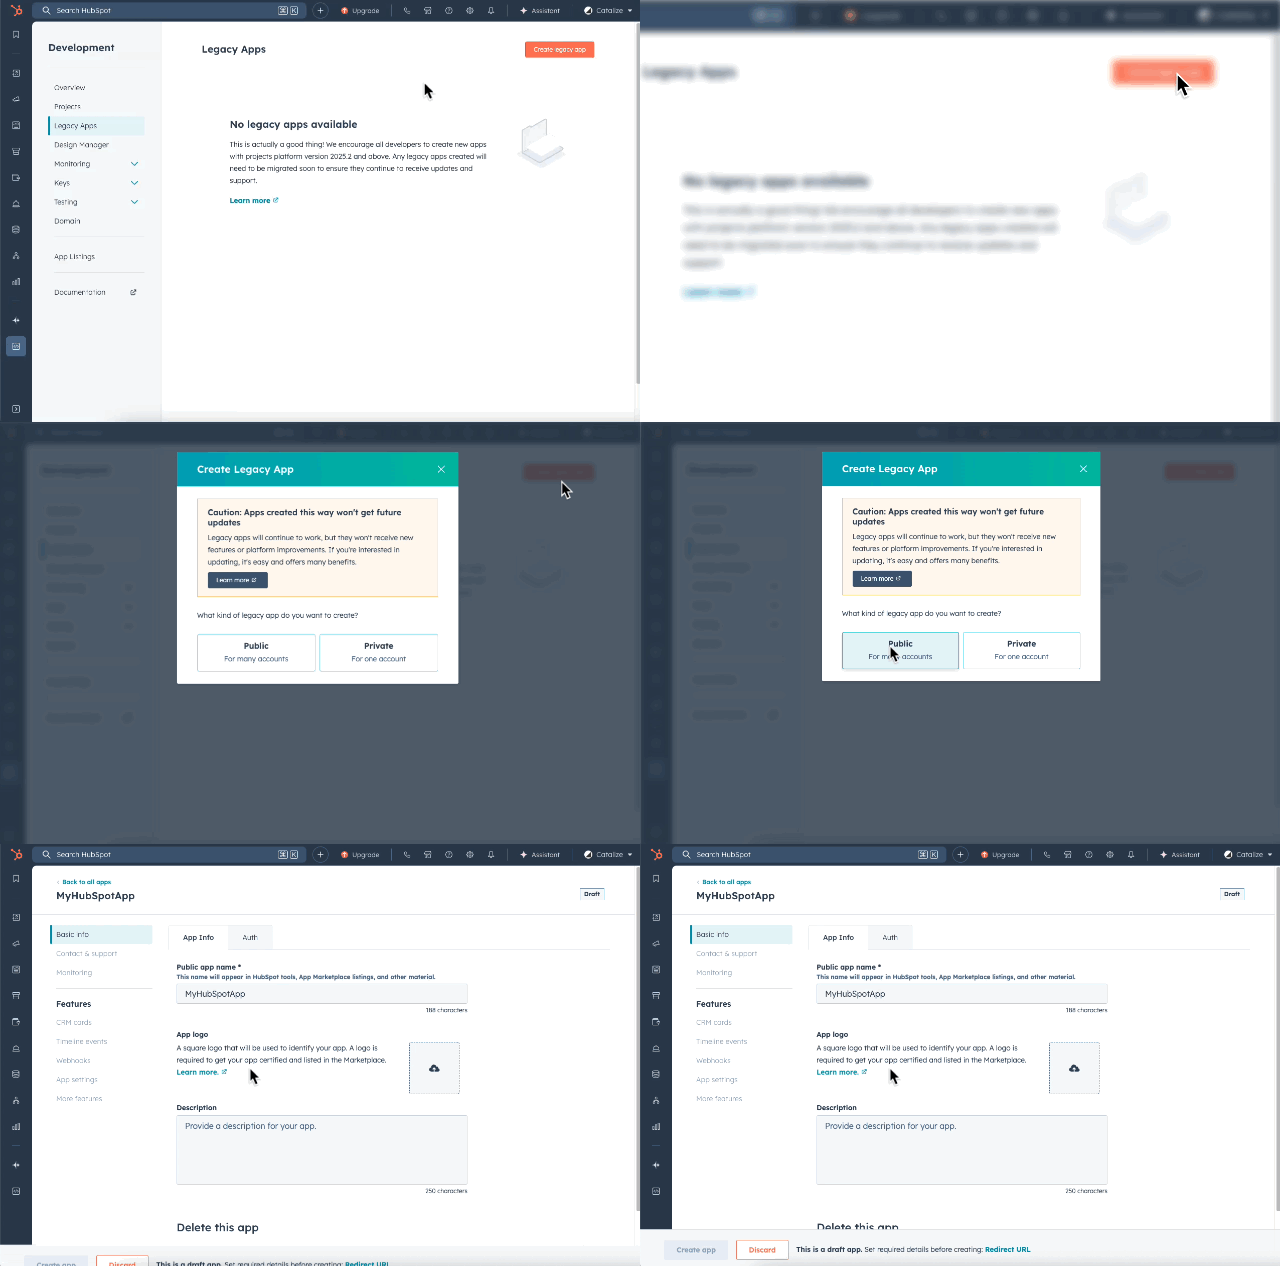 4. Enter **Public app name** and go to the **Auth** tab
Add Redirect URL: `https://api.withampersand.com/callbacks/v1/oauth` and click "Create app"
4. Enter **Public app name** and go to the **Auth** tab
Add Redirect URL: `https://api.withampersand.com/callbacks/v1/oauth` and click "Create app"
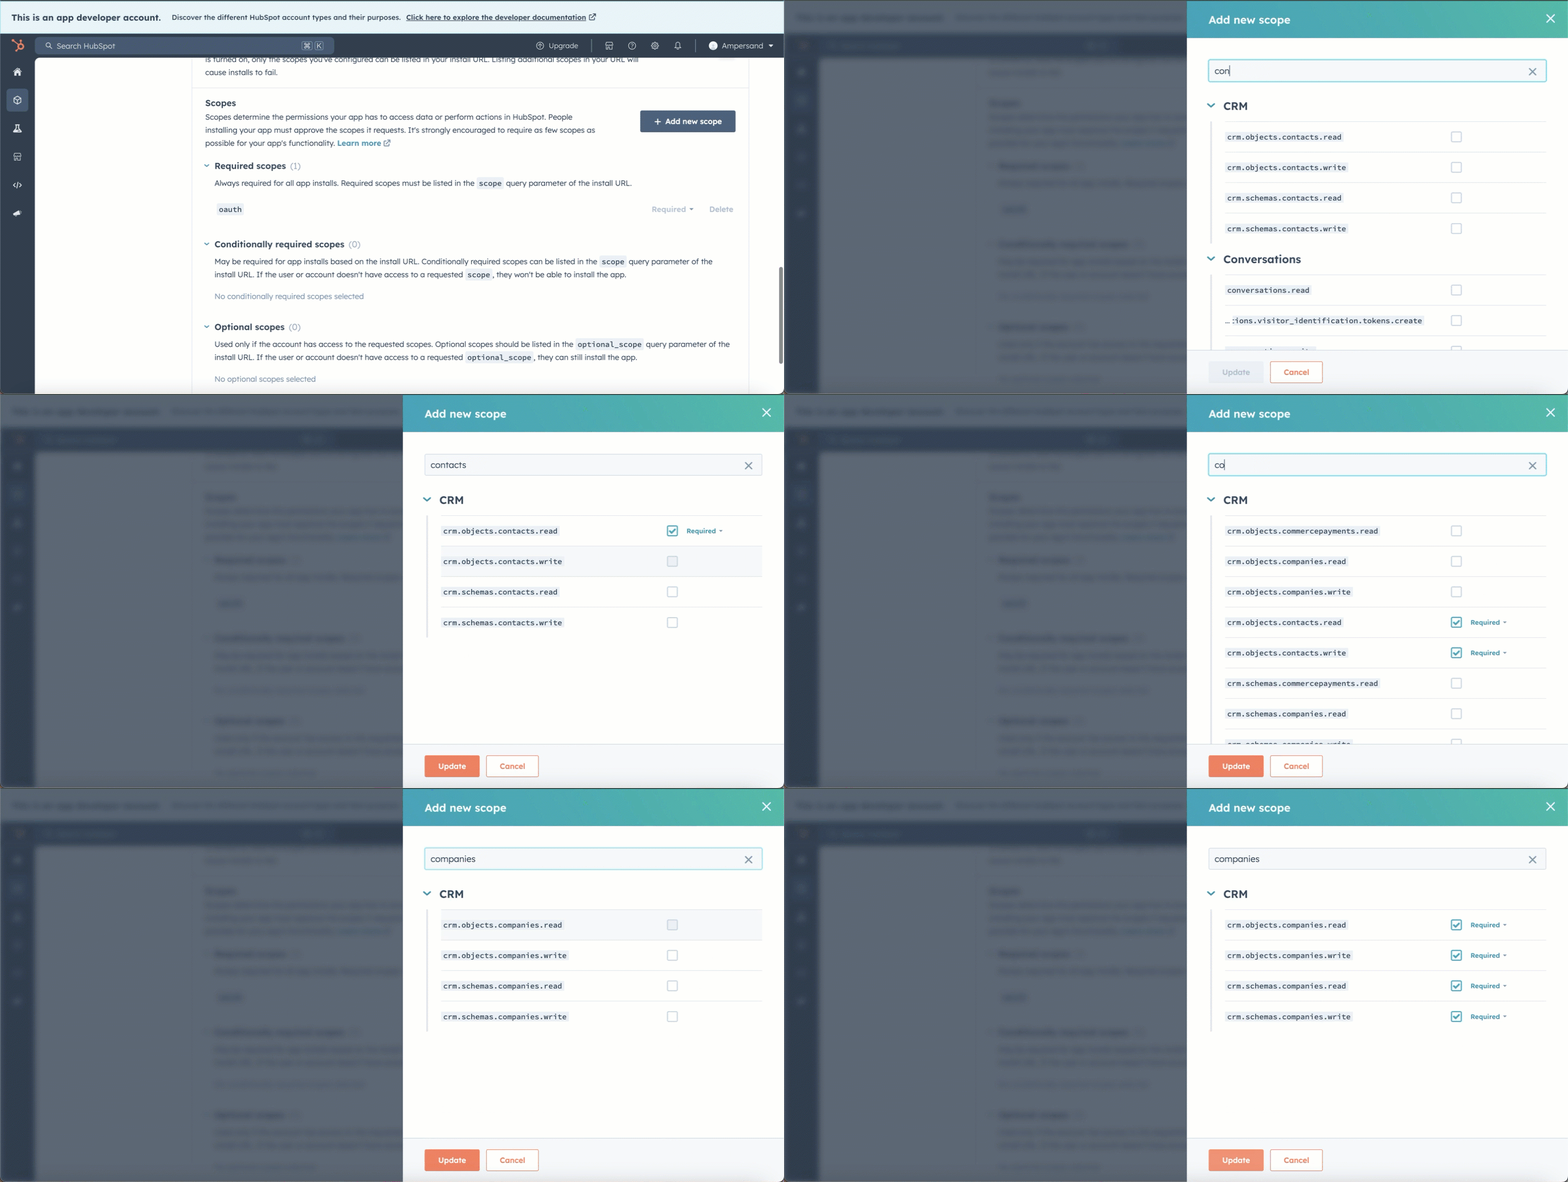
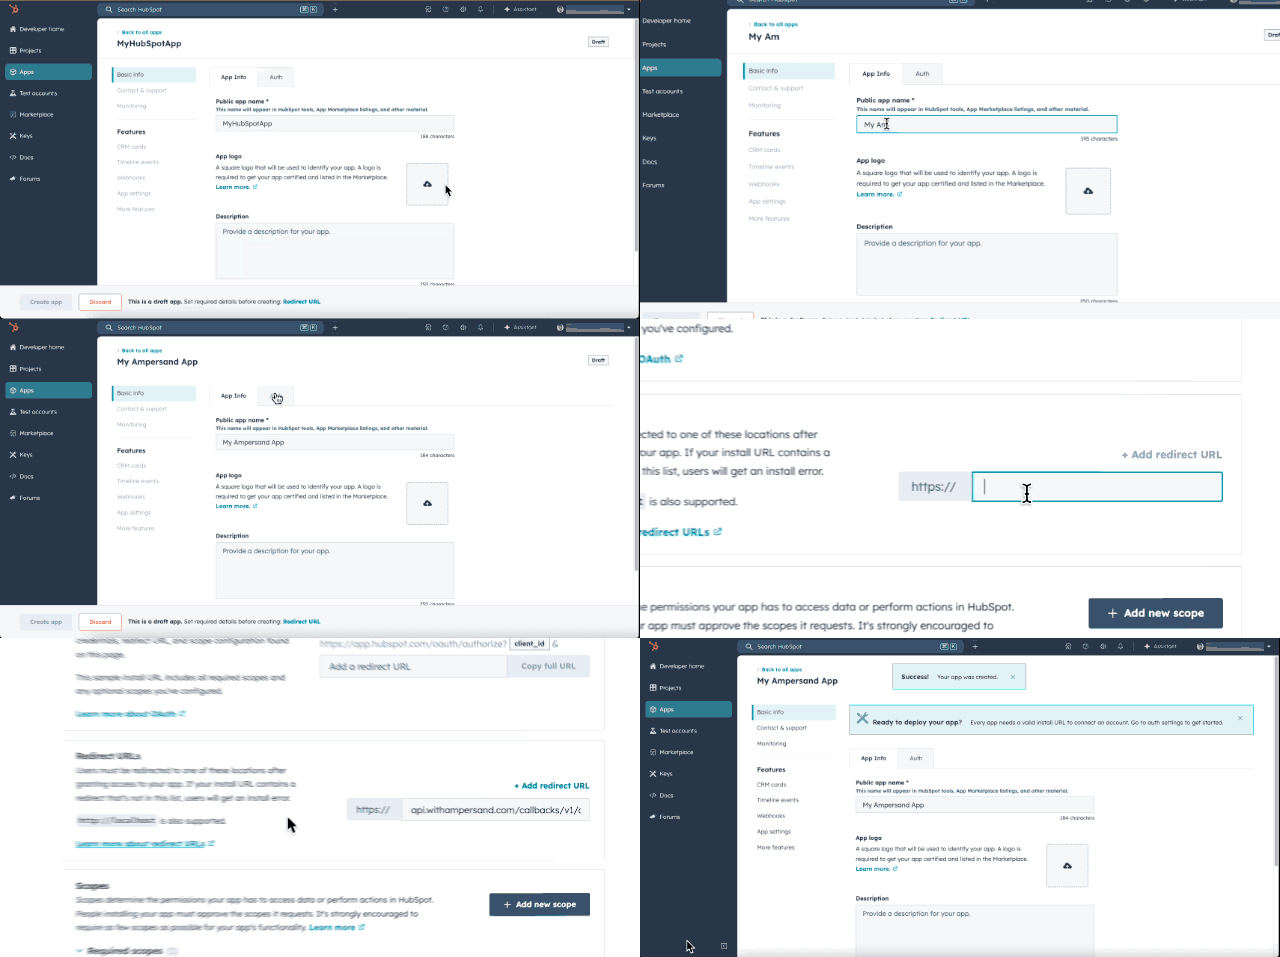 5. Go to the Scopes section, click "Add new scope" and **select your required scopes**
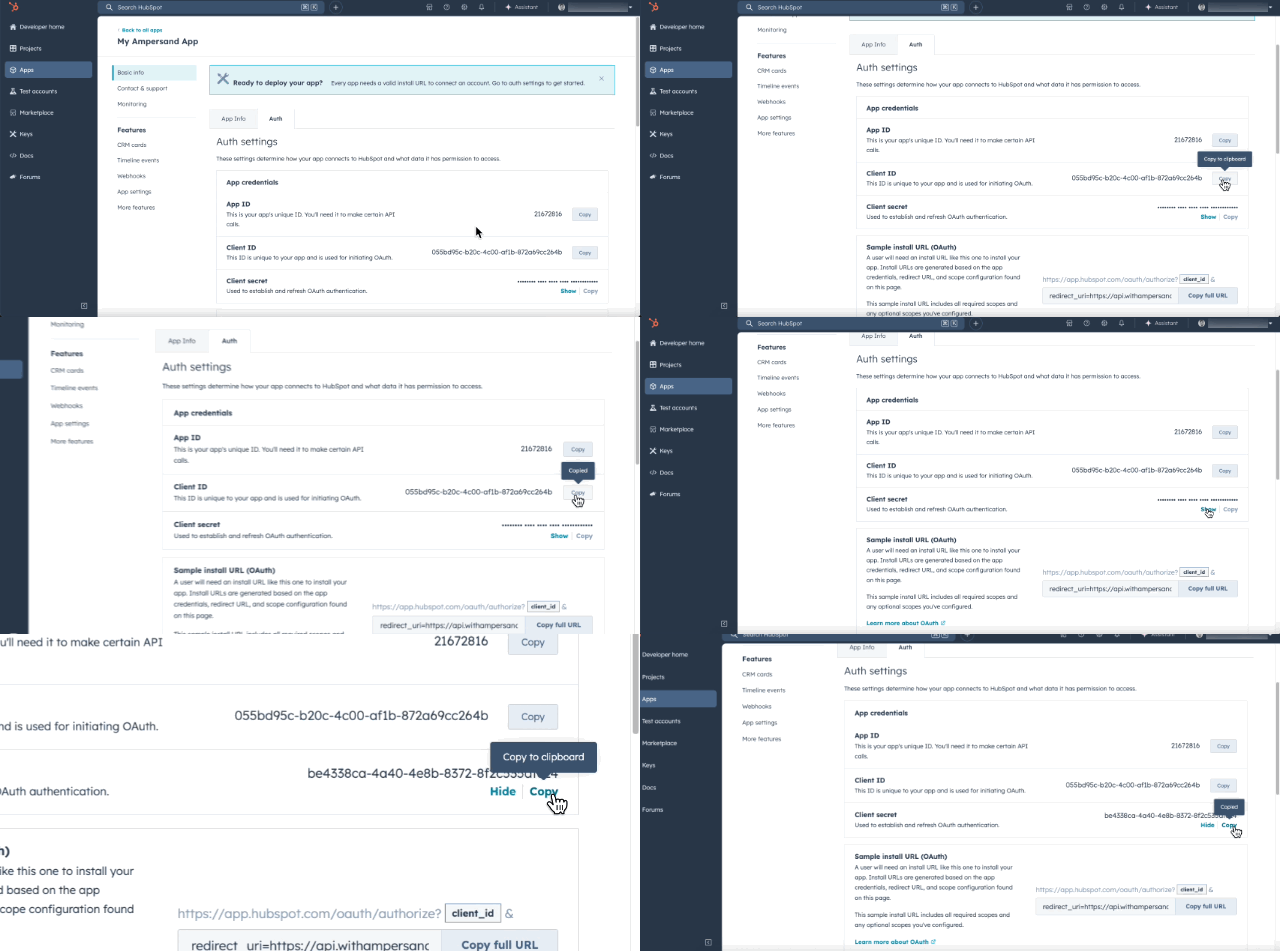
 6. **Copy your Client ID and Client Secret** from the Auth tab
 Jump to [Add App to Ampersand](#add-app-to-ampersand).
#### Developer accounts created before September 2025
1. Log in to your [HubSpot Developer Dashboard](https://app.hubspot.com/signup-hubspot/developers)
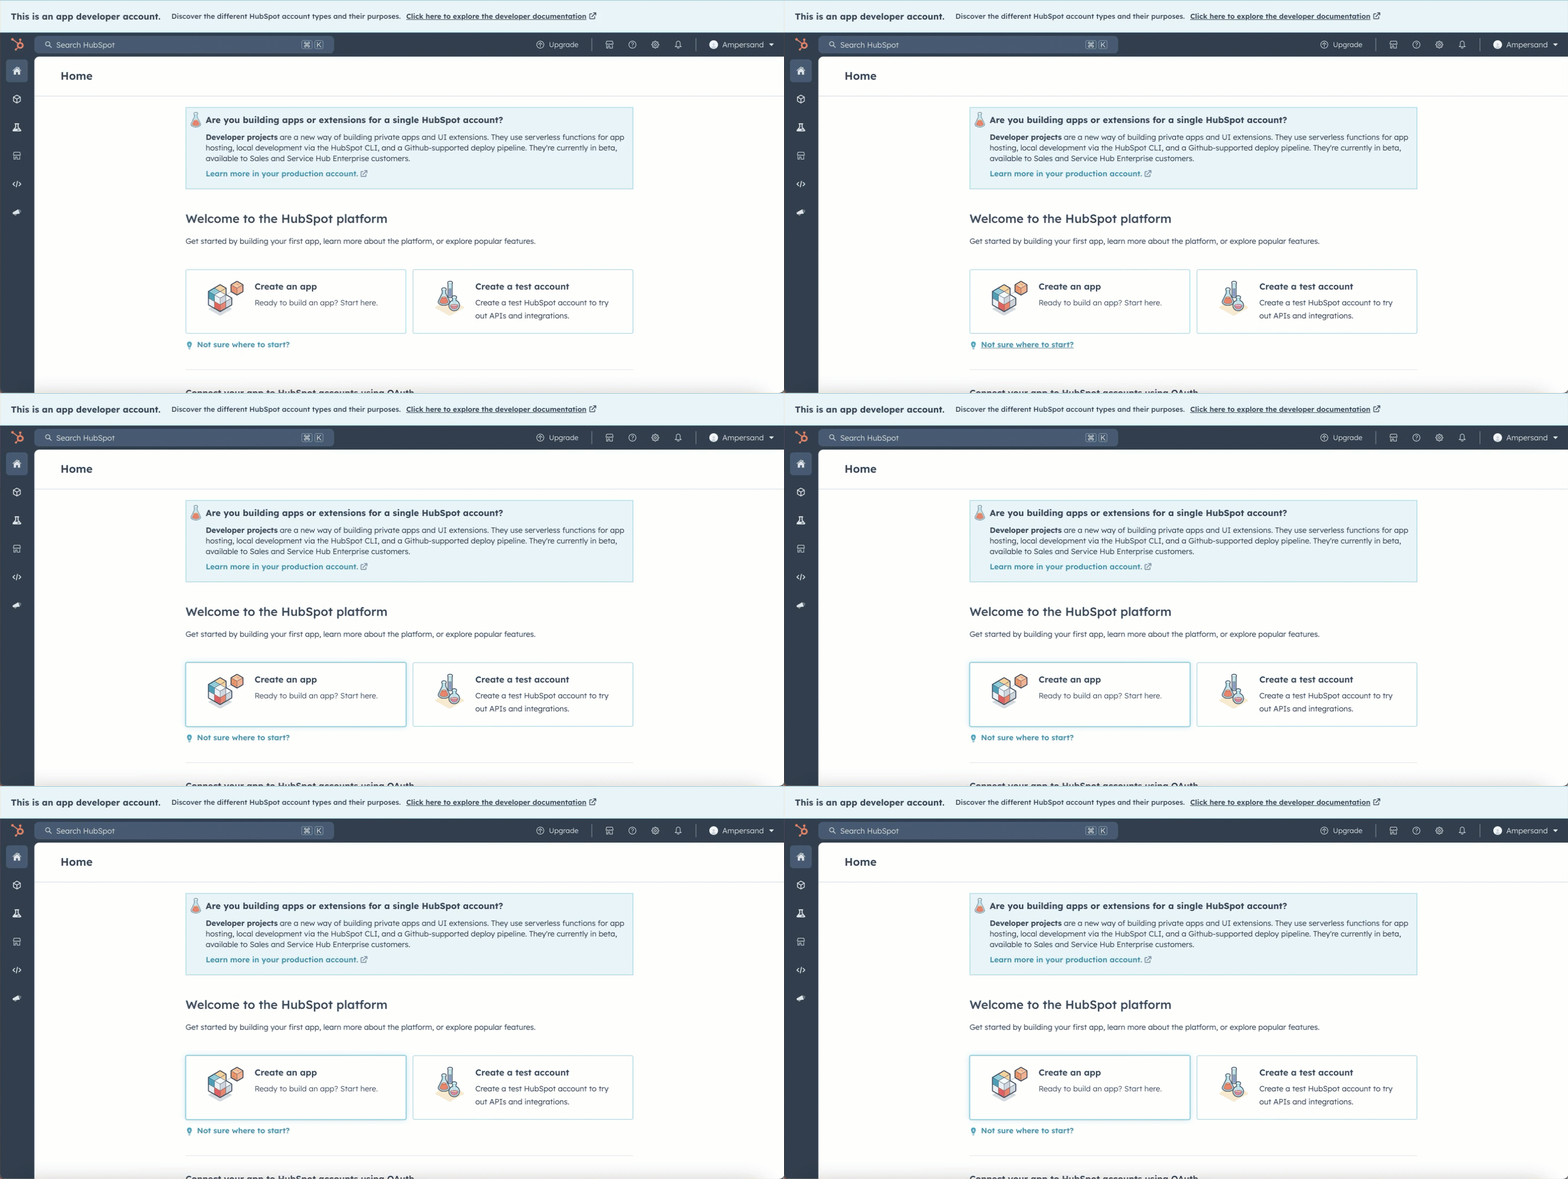
2. Click **Create an app**
Jump to [Add App to Ampersand](#add-app-to-ampersand).
#### Developer accounts created before September 2025
1. Log in to your [HubSpot Developer Dashboard](https://app.hubspot.com/signup-hubspot/developers)
2. Click **Create an app**
 3. Enter **Public app name**, click the **Auth** tab, add Redirect URL: `https://api.withampersand.com/callbacks/v1/oauth` and click "Create app"
4. Go to the **Scopes** tab and select your required scopes
5. Copy your **Client ID** and **Client Secret** from the Auth tab
Jump to [Add App to Ampersand](#add-app-to-ampersand)
## Add App to Ampersand
After creating your app using any method above:
1. Log in to your [Ampersand Dashboard](https://dashboard.withampersand.com)
2. Select your project → **Provider apps**
3. Select **HubSpot** from the Provider list
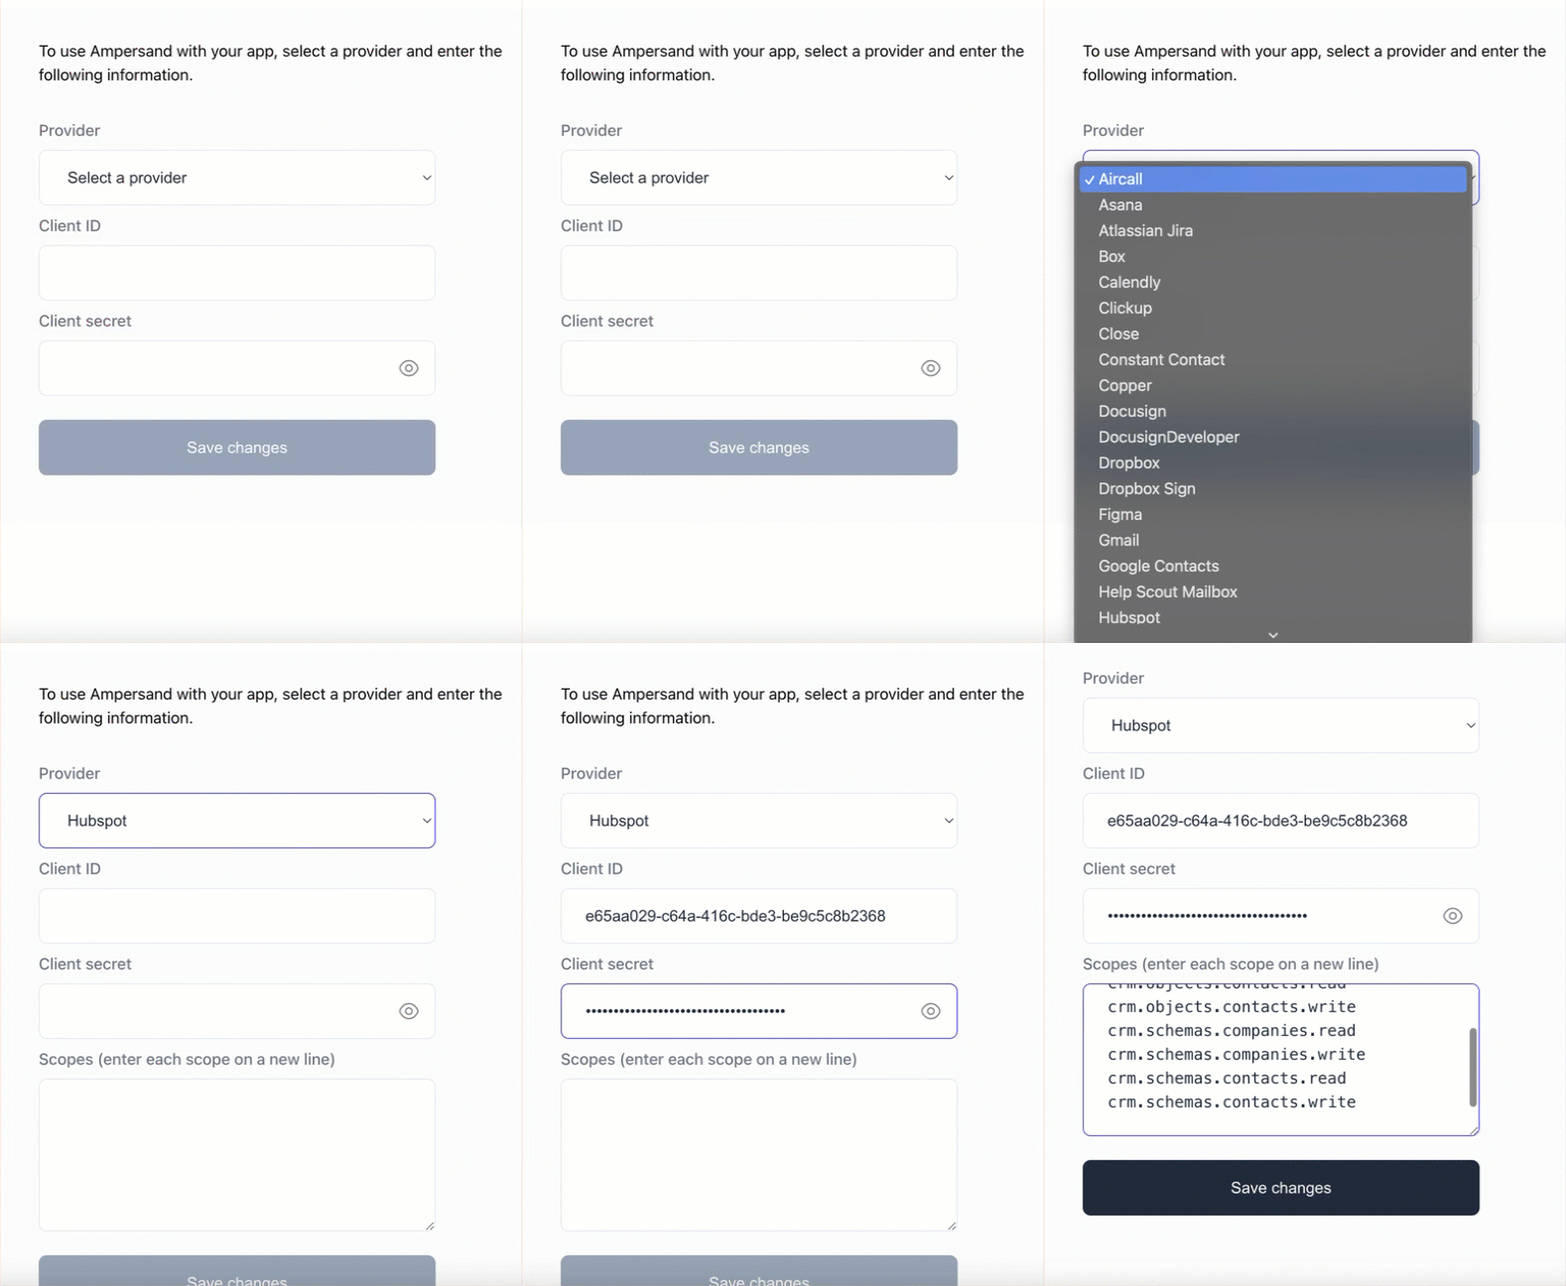
4. Enter your **Client ID**, **Client Secret**, and **Scopes** and click **Save changes**.
These scopes must should match the exact set of scopes defined in your HubSpot app.
3. Enter **Public app name**, click the **Auth** tab, add Redirect URL: `https://api.withampersand.com/callbacks/v1/oauth` and click "Create app"
4. Go to the **Scopes** tab and select your required scopes
5. Copy your **Client ID** and **Client Secret** from the Auth tab
Jump to [Add App to Ampersand](#add-app-to-ampersand)
## Add App to Ampersand
After creating your app using any method above:
1. Log in to your [Ampersand Dashboard](https://dashboard.withampersand.com)
2. Select your project → **Provider apps**
3. Select **HubSpot** from the Provider list
4. Enter your **Client ID**, **Client Secret**, and **Scopes** and click **Save changes**.
These scopes must should match the exact set of scopes defined in your HubSpot app.
 ## Using the connector
To start integrating with HubSpot:
* Create a manifest file like the [example](https://github.com/amp-labs/samples/blob/main/hubspot/amp.yaml)
* Deploy it using the [amp CLI](/cli/overview)
* If using Read or Subscribe Actions, create a [destination](/destinations)
* Embed the [InstallIntegration](/embeddable-ui-components#install-integration) UI component
* Start using the connector!
## Customer guide
Share the [HubSpot customer guide](/customer-guides/hubspot) with your customers to help them use your integration.
## Publish to HubSpot Marketplace
When you are ready to list on the HubSpot marketplace, follow the instructions in the [HubSpot documentation](https://developers.hubspot.com/docs/apps/developer-platform/list-apps/listing-your-app/listing-your-app).
* For the **App Information** section, you should use information about your company, not about Ampersand.
* For **Install Button URL**, use the URL of your application that users go to to start the installation process (this is usually where you've embedded the Ampersand UI Component).
## Using the connector
To start integrating with HubSpot:
* Create a manifest file like the [example](https://github.com/amp-labs/samples/blob/main/hubspot/amp.yaml)
* Deploy it using the [amp CLI](/cli/overview)
* If using Read or Subscribe Actions, create a [destination](/destinations)
* Embed the [InstallIntegration](/embeddable-ui-components#install-integration) UI component
* Start using the connector!
## Customer guide
Share the [HubSpot customer guide](/customer-guides/hubspot) with your customers to help them use your integration.
## Publish to HubSpot Marketplace
When you are ready to list on the HubSpot marketplace, follow the instructions in the [HubSpot documentation](https://developers.hubspot.com/docs/apps/developer-platform/list-apps/listing-your-app/listing-your-app).
* For the **App Information** section, you should use information about your company, not about Ampersand.
* For **Install Button URL**, use the URL of your application that users go to to start the installation process (this is usually where you've embedded the Ampersand UI Component).